The image of a document page is represented by aPixmap, and the simplest way to create a pixmap is via methodPage.get_pixmap().
This method has many options to influence the result. The most important among them is theMatrix, which lets youzoom, rotate, distort or mirror the outcome.
In the following, we apply azoom factor of 2 to each dimension, which will generate an image with a four times better resolution for us (and also about 4 times the size):
zoom_x = 2.0  # horizontal zoom
zoom_y = 2.0  # vertical zoom
mat = fitz.Matrix(zoom_x, zoom_y)  # zoom factor 2 in each dimension
pix = page.get_pixmap(matrix=mat)  # use 'mat' instead of the identity matrix

dpi = 600
pix = page.get_pixmap(dpi)
Since version 1.19.2 there is a more direct way to set the resolution: Parameter"dpi"(dots per inch) can be used in place of"matrix". To create a 300 dpi image of a page specifypix=page.get_pixmap(dpi=300). Apart from notation brevity, this approach has the additional advantage that thedpi value is saved with the imagefile – which does not happen automatically when using the Matrix notation.
# 파이썬 컴파일 경로가 달라서 현재 폴더의 이미지를 호출하지 못할때 작업디렉토리를 변경한다.
import os
from pathlib import Path
# src 상위 폴더를 실행폴더로 지정하려고 한다.
###real_path = Path(__file__).parent.parent
real_path = Path(__file__).parent
print(real_path)
#작업 디렉토리 변경
os.chdir(real_path)
"""_summary_
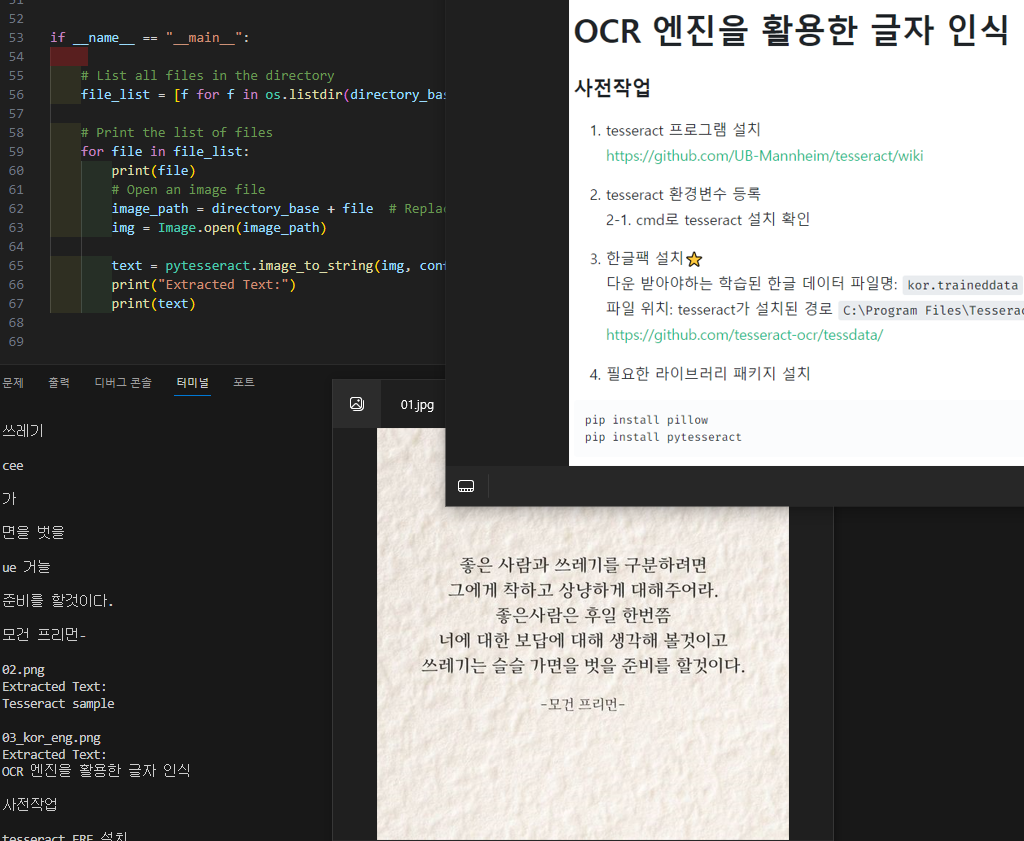
pip install pillow
pip install pytesseract
다운 받아야하는 학습된 한글 데이터 파일명: kor.traineddata
파일 위치: tesseract가 설치된 경로 C:\Program Files\Tesseract-OCR\tessdata
"""
from PIL import Image
import pytesseract
import cv2
import matplotlib.pyplot as plt
pytesseract.pytesseract.tesseract_cmd = r'C:\Program Files\Tesseract-OCR\tesseract.exe'
config = ('-l kor+eng --oem 3 --psm 11')
#config = ('-l kor+eng')
directory_base = str(real_path)+"./img/" # 경로object를 문자열로 변경해서 합친다.
# Open an image file
image_path = directory_base+"03_kor_eng.png" # Replace with your image file path
img = Image.open(image_path)
# Use Tesseract to extract text
text = pytesseract.image_to_string(img, config=config)
print("Extracted Text:" + text)
image = cv2.imread(image_path)
rgb_image = cv2.cvtColor(image, cv2.COLOR_BGR2RGB)
plt.imshow(rgb_image)
# use Tesseract to OCR the image
# text = pytesseract.image_to_string(rgb_image, lang='kor+eng')
text = pytesseract.image_to_string(rgb_image, config=config)
print(text)
if __name__ == "__main__":
# List all files in the directory
file_list = [f for f in os.listdir(directory_base) if os.path.isfile(os.path.join(directory_base, f))]
# Print the list of files
for file in file_list:
print(file)
# Open an image file
image_path = directory_base + file # Replace with your image file path
img = Image.open(image_path)
text = pytesseract.image_to_string(img, config=config)
print("Extracted Text:")
print(text)
다운 받아야하는 학습된 한글 데이터 파일명:kor.traineddata 파일 위치: tesseract가 설치된 경로C:\Program Files\Tesseract-OCR\tessdata
*** 설치 할때 언어팩 선택
pytesseract 0.3.10
Python-tesseract is an optical character recognition (OCR) tool for python. That is, it will recognize and “read” the text embedded in images.
Python-tesseract is a wrapper forGoogle’s Tesseract-OCR Engine. It is also useful as a stand-alone invocation script to tesseract, as it can read all image types supported by the Pillow and Leptonica imaging libraries, including jpeg, png, gif, bmp, tiff, and others. Additionally, if used as a script, Python-tesseract will print the recognized text instead of writing it to a file.
USAGE
Quickstart
Note: Test images are located in thetests/datafolder of the Git repo.
Library usage:
from PIL import Image

import pytesseract

# If you don't have tesseract executable in your PATH, include the following:
pytesseract.pytesseract.tesseract_cmd = r'<full_path_to_your_tesseract_executable>'
# Example tesseract_cmd = r'C:\Program Files (x86)\Tesseract-OCR\tesseract'

# Simple image to string
print(pytesseract.image_to_string(Image.open('test.png')))

# In order to bypass the image conversions of pytesseract, just use relative or absolute image path
# NOTE: In this case you should provide tesseract supported images or tesseract will return error
print(pytesseract.image_to_string('test.png'))

# List of available languages
print(pytesseract.get_languages(config=''))

# French text image to string
print(pytesseract.image_to_string(Image.open('test-european.jpg'), lang='fra'))

# Batch processing with a single file containing the list of multiple image file paths
print(pytesseract.image_to_string('images.txt'))

# Timeout/terminate the tesseract job after a period of time
try:
    print(pytesseract.image_to_string('test.jpg', timeout=2)) # Timeout after 2 seconds
    print(pytesseract.image_to_string('test.jpg', timeout=0.5)) # Timeout after half a second
except RuntimeError as timeout_error:
    # Tesseract processing is terminated
    pass

# Get bounding box estimates
print(pytesseract.image_to_boxes(Image.open('test.png')))

# Get verbose data including boxes, confidences, line and page numbers
print(pytesseract.image_to_data(Image.open('test.png')))

# Get information about orientation and script detection
print(pytesseract.image_to_osd(Image.open('test.png')))

# Get a searchable PDF
pdf = pytesseract.image_to_pdf_or_hocr('test.png', extension='pdf')
with open('test.pdf', 'w+b') as f:
    f.write(pdf) # pdf type is bytes by default

# Get HOCR output
hocr = pytesseract.image_to_pdf_or_hocr('test.png', extension='hocr')

# Get ALTO XML output
xml = pytesseract.image_to_alto_xml('test.png')
Support for OpenCV image/NumPy array objects
import cv2

img_cv = cv2.imread(r'/<path_to_image>/digits.png')

# By default OpenCV stores images in BGR format and since pytesseract assumes RGB format,
# we need to convert from BGR to RGB format/mode:
img_rgb = cv2.cvtColor(img_cv, cv2.COLOR_BGR2RGB)
print(pytesseract.image_to_string(img_rgb))
# OR
img_rgb = Image.frombytes('RGB', img_cv.shape[:2], img_cv, 'raw', 'BGR', 0, 0)
print(pytesseract.image_to_string(img_rgb))
If you need custom configuration likeoem/psm, use theconfigkeyword.
# Example of adding any additional options
custom_oem_psm_config = r'--oem 3 --psm 6'
pytesseract.image_to_string(image, config=custom_oem_psm_config)

# Example of using pre-defined tesseract config file with options
cfg_filename = 'words'
pytesseract.run_and_get_output(image, extension='txt', config=cfg_filename)
Add the following config, if you have tessdata error like: “Error opening data file…”
# Example config: r'--tessdata-dir "C:\Program Files (x86)\Tesseract-OCR\tessdata"'
# It's important to add double quotes around the dir path.
tessdata_dir_config = r'--tessdata-dir "<replace_with_your_tessdata_dir_path>"'
pytesseract.image_to_string(image, lang='chi_sim', config=tessdata_dir_config)
Functions
get_languagesReturns all currently supported languages by Tesseract OCR.
get_tesseract_versionReturns the Tesseract version installed in the system.
image_to_stringReturns unmodified output as string from Tesseract OCR processing
image_to_boxesReturns result containing recognized characters and their box boundaries
image_to_dataReturns result containing box boundaries, confidences, and other information. Requires Tesseract 3.05+. For more information, please check theTesseract TSV documentation
image_to_osdReturns result containing information about orientation and script detection.
image_to_alto_xmlReturns result in the form of Tesseract’s ALTO XML format.
run_and_get_outputReturns the raw output from Tesseract OCR. Gives a bit more control over the parameters that are sent to tesseract.
imageObject or String - PIL Image/NumPy array or file path of the image to be processed by Tesseract. If you pass object instead of file path, pytesseract will implicitly convert the image toRGB mode.
langString - Tesseract language code string. Defaults toengif not specified! Example for multiple languages:lang='eng+fra'
configString - Anyadditional custom configuration flagsthat are not available via the pytesseract function. For example:config='--psm6'
niceInteger - modifies the processor priority for the Tesseract run. Not supported on Windows. Nice adjusts the niceness of unix-like processes.
output_typeClass attribute - specifies the type of the output, defaults tostring. For the full list of all supported types, please check the definition ofpytesseract.Outputclass.
timeoutInteger or Float - duration in seconds for the OCR processing, after which, pytesseract will terminate and raise RuntimeError.
pandas_configDict - only for theOutput.DATAFRAMEtype. Dictionary with custom arguments forpandas.read_csv. Allows you to customize the output ofimage_to_data.
CLI usage:
pytesseract [-l lang] image_file
INSTALLATION
Prerequisites:
Python-tesseract requires Python 3.6+
You will need the Python Imaging Library (PIL) (or thePillowfork). Under Debian/Ubuntu, this is the packagepython-imagingorpython3-imaging.
InstallGoogle Tesseract OCR(additional info how to install the engine on Linux, Mac OSX and Windows). You must be able to invoke the tesseract command astesseract. If this isn’t the case, for example because tesseract isn’t in your PATH, you will have to change the “tesseract_cmd” variablepytesseract.pytesseract.tesseract_cmd. Under Debian/Ubuntu you can use the packagetesseract-ocr. For Mac OS users. please install homebrew packagetesseract.
Note:In some rare cases, you might need to additionally installtessconfigsandconfigsfromtesseract-ocr/tessconfigsif the OS specific package doesn’t include them.
// `response` is an instance of System.Net.Http.HttpResponseMessage
response.Headers.CacheControl = new CacheControlHeaderValue
{
    NoCache = true,
    NoStore = true,
    MustRevalidate = true
};
response.Headers.Pragma.ParseAdd("no-cache");
// We can't use `response.Content.Headers.Expires` directly
// since it allows only `DateTimeOffset?` values.
response.Content?.Headers.TryAddWithoutValidation("Expires", 0.ToString());
사람에 따라 꿈에 대한 정의나 이미지가 다르겠지만, 저에게 꿈은 목표로 삼아야 하는 것이라기보다는 꼭 되어야 할 모습이에요. 그러니까 목표가 아니라 의무죠. 꿈을 위해 산다는 건 멋진 일이에요. 나답게 자유로운 삶을 살기 위해서는 꿈을 갖는 것이 중요해요. - 테라오 겐 발뮤다 창업회장, ‘상식의 틀을 깨라’에서
“꿈이 의무가 되는 것이 오히려 마음도 편하고 즐거워요. 이런 의무는 부담스럽게 느껴지지도 않아요. ‘나라면 할 수 있다’라는 전제에 긍정적인 기운이 담겨 있기 때문이죠. 꿈이 단순히 하고 싶은 희망인 경우라면 행동이 좀처럼 따라주지 않을 수도 있지만 꼭 해야만 하는 일이 되면 저절로 행동이 따르게 되거든요.”
스테가노그래피는 그리스어로 ‘감춰져 있다’를 뜻하는 ‘stegano’와 통신을 뜻하는 ‘graphos’가 결합한 단어다.
그 기원은 고대 그리스로 거슬러 올라간다. 기원전 440년, 그리스의 왕 히스티아에우스는 다른 나라의 인질로 잡힌다. 양아들에게 밀서를 보낼 방법을 고민하던 히스티아에우스는 노예의 머리를 깎고 두피에 비밀 메시지를 문신으로 새겨넣었다. 곧 노예의 머리카락이 자라 문신이 보이지 않게 되자 히스티아에우스는 노예를 양아들에게 보냈다. 양아들은 노예의 머리를 다시 깎아 비밀 메시지를 확인할 수 있었다. 이 일화가 문서에 기록된 인류의 첫 스테가노그래피다.
스테가노그래피는 이후 디지털 세상으로 넘어와 여러 방법으로 진화했다. 많은 사람이 암호화 기법인 크립토그래피(cryptography)와 디지털 스테가노그래피를 헷갈리지만, 둘은 상이한 기법이다. 암호화 기법은 상대방이 이해할 수 없는 내용을 작성해 그 안에 비밀을 숨겨놓는다. 반면 디지털 스테가노그래피는 이미지, 오디오 파일, 동영상 클립, 텍스트 파일 등 무해해 보이는 객체 안에 비밀 메시지를 감춰두는 방식으로 그 내용을 숨긴다. 오늘날에는 테러범 혹은 정부 첩보기관이 정보를 주고받을 때 디지털 스테가노그래피 기법을 많이 사용한다.
2001년 9·11 테러 당시 오사마 빈 라덴이 테러범들과 메시지를 주고받을 때 사용된 기법도 스테가노그래피였다. 그는 모나리자 그림에 비행기 도면을 숨겨 테러범에게 전송했다. 2011년 북한이 남한 내 간첩조직과 교신할 때도 이 기법을 사용했다.
최근 스테가노그래피는 단순히 비밀 메시지를 전달하는 목적 외에도 멀웨어를 숨기는 데 빈번하게 사용되고 있다. 보안 솔루션 기업 맥아피는 스테가노그래피 기법을 이용한 사이버 공격 사례가 그 어느 때보다 다양해지고 있다고 분석했다.
맥아피에 따르면, 사이버 공격에 스테가노그래피가 처음 사용된 것은 2011년 출현한 악성코드 ‘두쿠'(Duqu) 사례다. 두쿠는 피해자의 시스템으로부터 정보를 수집해 JPEG 파일에 숨겨 자신의 제어 서버로 전송했다. 스테가노그래피는 2014년 말 ‘러크'(Lurk)라는 멀웨어가 악성코드를 유포하는 데도 사용됐다. 최근에는 이미지 스테가노그래피가 스테고로더와 여러 멀버타이징온라인 광고를 통한 악성코드 유포.close에 사용되고 있다. 지난달에는 스테가노그래피 기법을 이용한 랜섬웨어 유포 수법이 등장하기도 했다.
스테가노그래피가 해커들이 애용하는 공격 기법으로 떠오른 이유는 대부분 안티멀웨어 탐지를 우회할 수 있어 피해 예방이 매우 어렵기 때문이다. 하지만 가능한 대응 방안들은 존재한다.
맥아피는
▲이미지 소프트웨어의 도움을 받아 스테가노그래피로 의심되는 색상 차이를 탐색하기
▲스테가노그래피 공격을 받을 때를 대비해 네트워크 세분화와 가상 시스템 아키텍처를 함께 활용할 것
▲신뢰할 수 있는 공급 업체가 제공한 서명이 있는 애플리케이션만 설치할 것
등 대응 방안을 소개했다.
스테가노그래피, 직접 만들어보자
악용하지만 않는다면 디지털 스테가노그래피는 나만의 비밀을 숨길 수 있는 흥미로운 기법이다. 간단한 스테가노그래피는 무료 오픈소스 도구를 이용해 간편하게 만들 수 있다.