# 파이썬 컴파일 경로가 달라서 현재 폴더의 이미지를 호출하지 못할때 작업디렉토리를 변경한다.
import os
from pathlib import Path
# src 상위 폴더를 실행폴더로 지정하려고 한다.
###real_path = Path(__file__).parent.parent
real_path = Path(__file__).parent
print(real_path)
#작업 디렉토리 변경
os.chdir(real_path)
"""_summary_
pip install pillow
pip install pytesseract
다운 받아야하는 학습된 한글 데이터 파일명: kor.traineddata
파일 위치: tesseract가 설치된 경로 C:\Program Files\Tesseract-OCR\tessdata
"""
from PIL import Image
import pytesseract
import cv2
import matplotlib.pyplot as plt
pytesseract.pytesseract.tesseract_cmd = r'C:\Program Files\Tesseract-OCR\tesseract.exe'
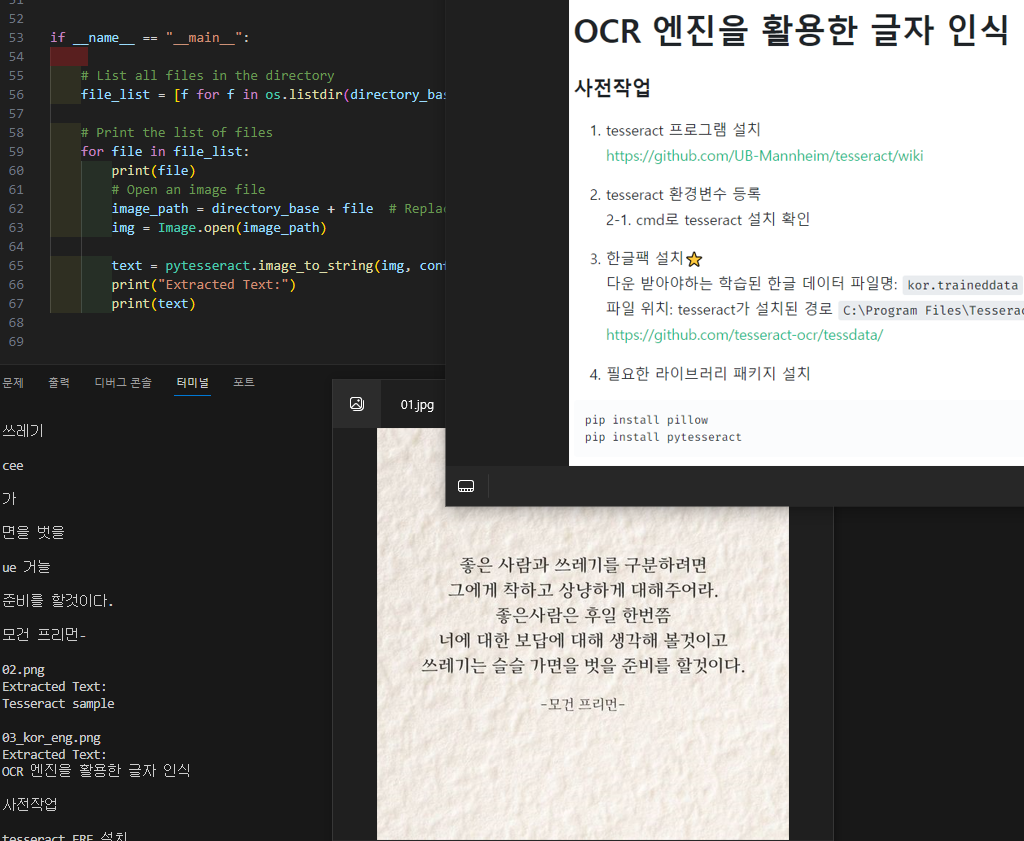
config = ('-l kor+eng --oem 3 --psm 11')
#config = ('-l kor+eng')
directory_base = str(real_path)+"./img/" # 경로object를 문자열로 변경해서 합친다.
# Open an image file
image_path = directory_base+"03_kor_eng.png" # Replace with your image file path
img = Image.open(image_path)
# Use Tesseract to extract text
text = pytesseract.image_to_string(img, config=config)
print("Extracted Text:" + text)
image = cv2.imread(image_path)
rgb_image = cv2.cvtColor(image, cv2.COLOR_BGR2RGB)
plt.imshow(rgb_image)
# use Tesseract to OCR the image
# text = pytesseract.image_to_string(rgb_image, lang='kor+eng')
text = pytesseract.image_to_string(rgb_image, config=config)
print(text)
if __name__ == "__main__":
# List all files in the directory
file_list = [f for f in os.listdir(directory_base) if os.path.isfile(os.path.join(directory_base, f))]
# Print the list of files
for file in file_list:
print(file)
# Open an image file
image_path = directory_base + file # Replace with your image file path
img = Image.open(image_path)
text = pytesseract.image_to_string(img, config=config)
print("Extracted Text:")
print(text)
다운 받아야하는 학습된 한글 데이터 파일명:kor.traineddata 파일 위치: tesseract가 설치된 경로C:\Program Files\Tesseract-OCR\tessdata
*** 설치 할때 언어팩 선택
pytesseract 0.3.10
Python-tesseract is an optical character recognition (OCR) tool for python. That is, it will recognize and “read” the text embedded in images.
Python-tesseract is a wrapper forGoogle’s Tesseract-OCR Engine. It is also useful as a stand-alone invocation script to tesseract, as it can read all image types supported by the Pillow and Leptonica imaging libraries, including jpeg, png, gif, bmp, tiff, and others. Additionally, if used as a script, Python-tesseract will print the recognized text instead of writing it to a file.
USAGE
Quickstart
Note: Test images are located in thetests/datafolder of the Git repo.
Library usage:
from PIL import Image

import pytesseract

# If you don't have tesseract executable in your PATH, include the following:
pytesseract.pytesseract.tesseract_cmd = r'<full_path_to_your_tesseract_executable>'
# Example tesseract_cmd = r'C:\Program Files (x86)\Tesseract-OCR\tesseract'

# Simple image to string
print(pytesseract.image_to_string(Image.open('test.png')))

# In order to bypass the image conversions of pytesseract, just use relative or absolute image path
# NOTE: In this case you should provide tesseract supported images or tesseract will return error
print(pytesseract.image_to_string('test.png'))

# List of available languages
print(pytesseract.get_languages(config=''))

# French text image to string
print(pytesseract.image_to_string(Image.open('test-european.jpg'), lang='fra'))

# Batch processing with a single file containing the list of multiple image file paths
print(pytesseract.image_to_string('images.txt'))

# Timeout/terminate the tesseract job after a period of time
try:
    print(pytesseract.image_to_string('test.jpg', timeout=2)) # Timeout after 2 seconds
    print(pytesseract.image_to_string('test.jpg', timeout=0.5)) # Timeout after half a second
except RuntimeError as timeout_error:
    # Tesseract processing is terminated
    pass

# Get bounding box estimates
print(pytesseract.image_to_boxes(Image.open('test.png')))

# Get verbose data including boxes, confidences, line and page numbers
print(pytesseract.image_to_data(Image.open('test.png')))

# Get information about orientation and script detection
print(pytesseract.image_to_osd(Image.open('test.png')))

# Get a searchable PDF
pdf = pytesseract.image_to_pdf_or_hocr('test.png', extension='pdf')
with open('test.pdf', 'w+b') as f:
    f.write(pdf) # pdf type is bytes by default

# Get HOCR output
hocr = pytesseract.image_to_pdf_or_hocr('test.png', extension='hocr')

# Get ALTO XML output
xml = pytesseract.image_to_alto_xml('test.png')
Support for OpenCV image/NumPy array objects
import cv2

img_cv = cv2.imread(r'/<path_to_image>/digits.png')

# By default OpenCV stores images in BGR format and since pytesseract assumes RGB format,
# we need to convert from BGR to RGB format/mode:
img_rgb = cv2.cvtColor(img_cv, cv2.COLOR_BGR2RGB)
print(pytesseract.image_to_string(img_rgb))
# OR
img_rgb = Image.frombytes('RGB', img_cv.shape[:2], img_cv, 'raw', 'BGR', 0, 0)
print(pytesseract.image_to_string(img_rgb))
If you need custom configuration likeoem/psm, use theconfigkeyword.
# Example of adding any additional options
custom_oem_psm_config = r'--oem 3 --psm 6'
pytesseract.image_to_string(image, config=custom_oem_psm_config)

# Example of using pre-defined tesseract config file with options
cfg_filename = 'words'
pytesseract.run_and_get_output(image, extension='txt', config=cfg_filename)
Add the following config, if you have tessdata error like: “Error opening data file…”
# Example config: r'--tessdata-dir "C:\Program Files (x86)\Tesseract-OCR\tessdata"'
# It's important to add double quotes around the dir path.
tessdata_dir_config = r'--tessdata-dir "<replace_with_your_tessdata_dir_path>"'
pytesseract.image_to_string(image, lang='chi_sim', config=tessdata_dir_config)
Functions
get_languagesReturns all currently supported languages by Tesseract OCR.
get_tesseract_versionReturns the Tesseract version installed in the system.
image_to_stringReturns unmodified output as string from Tesseract OCR processing
image_to_boxesReturns result containing recognized characters and their box boundaries
image_to_dataReturns result containing box boundaries, confidences, and other information. Requires Tesseract 3.05+. For more information, please check theTesseract TSV documentation
image_to_osdReturns result containing information about orientation and script detection.
image_to_alto_xmlReturns result in the form of Tesseract’s ALTO XML format.
run_and_get_outputReturns the raw output from Tesseract OCR. Gives a bit more control over the parameters that are sent to tesseract.
imageObject or String - PIL Image/NumPy array or file path of the image to be processed by Tesseract. If you pass object instead of file path, pytesseract will implicitly convert the image toRGB mode.
langString - Tesseract language code string. Defaults toengif not specified! Example for multiple languages:lang='eng+fra'
configString - Anyadditional custom configuration flagsthat are not available via the pytesseract function. For example:config='--psm6'
niceInteger - modifies the processor priority for the Tesseract run. Not supported on Windows. Nice adjusts the niceness of unix-like processes.
output_typeClass attribute - specifies the type of the output, defaults tostring. For the full list of all supported types, please check the definition ofpytesseract.Outputclass.
timeoutInteger or Float - duration in seconds for the OCR processing, after which, pytesseract will terminate and raise RuntimeError.
pandas_configDict - only for theOutput.DATAFRAMEtype. Dictionary with custom arguments forpandas.read_csv. Allows you to customize the output ofimage_to_data.
CLI usage:
pytesseract [-l lang] image_file
INSTALLATION
Prerequisites:
Python-tesseract requires Python 3.6+
You will need the Python Imaging Library (PIL) (or thePillowfork). Under Debian/Ubuntu, this is the packagepython-imagingorpython3-imaging.
InstallGoogle Tesseract OCR(additional info how to install the engine on Linux, Mac OSX and Windows). You must be able to invoke the tesseract command astesseract. If this isn’t the case, for example because tesseract isn’t in your PATH, you will have to change the “tesseract_cmd” variablepytesseract.pytesseract.tesseract_cmd. Under Debian/Ubuntu you can use the packagetesseract-ocr. For Mac OS users. please install homebrew packagetesseract.
Note:In some rare cases, you might need to additionally installtessconfigsandconfigsfromtesseract-ocr/tessconfigsif the OS specific package doesn’t include them.
플로고리듬(Flowgorithm)은 프로그램의 구조를 시각적으로 나타내는 흐름도(flowchart)를 작성하는 도구이자, 그 자체로 프로그래밍 언어입니다. 플로고리듬으로 흐름도만 작성하면 다른 프로그래밍 언어로 코딩하는 과정 없이 곧바로 실행 결과를 볼 수 있으며, 의사코드(pseudocode) 및 각종 프로그래밍 언어 코드를 자동으로 생성할 수도 있습니다.
플로고리듬으로 아주 간단한 hello world 예제부터 시작해 점차 복잡한 알고리듬을 구현(!)해봄으로써, 순수한 재미도 느껴보고 교육이나 실무에 쓸모가 있을지도 알아보려고 합니다.
이 책을 따라 하다보면 다음을 자연스레 익힐 수 있을 것입니다.
흐름도 작성법
플로고리듬 사용법
프로그래밍의 기본 원리
의사코드
기초 알고리듬
흐름도를 직접 작성하지 않더라도, 여기에 실린 흐름도와 실행 영상을 참고해서 각자 사용하는 언어로 구현하는 것도 좋습니다.
hetechnical interviewis hard to master and can be a nerve-racking experience. Not only do you need to know what you are talking about, but you also have to prove it to the personinterviewingyou. Fortunately, most fears of failure in this regard are exaggerated, and often, the interview will boil down to only a few potentially difficult questions.
4 METHODS FOR SOLVING FIZZBUZZ IN PYTHON
Conditional statements.
String concatenation.
Itertools.
Lambda.
One very common problem that programmers are asked to solve in technical interviews and take-home assignments is theFizzBuzz problem. FizzBuzz is a word game designed for children to teach them about division. In the game, each number divisible by three will be returned with aFizzand any number divisible by four will return aBuzz. I was never a big fan of the test, but it can help weed out weaker applicants.
While the test is pretty easy to pass so long as you know the right operators, there are a variety of different ways to solve it. However, some solutions might prove to be more impressive than others, and I think this is something to keep in mind when working on this problem for a real interview. In addition todemonstratingthese alternative methods of solving FizzBuzz, we are going to time each solution and compare the respective results.
How to Solve FizzBuzz in Python
1. CONDITIONAL STATEMENTS
The most popular and well-known solution to this problem involves usingconditional statements. For every number in n, we are going to need to check if that number is divisible by four or three. If the number is divisible by three, it will printFizz; if the number is divisible by four, it will printBuzz. The key here is simply knowing what operators to use to check for divisibility. InPython, we can use the modulus operator,%.
In computing, the modulo operation is meant to return the signed remainder of division. If a number is divisible by another, the remainder will always be zero, so we can use that to our advantage whenever we make our FizzBuzz function. We will structure condition blocks like this, wherenumis the iteration in a list of numbers.
    if num % 3 == 0:
        print('Fizz')
We can now build an iterativeloopfollowing the same principle, except we’ll be addingFizzandBuzz:
for num in range(1,101):
    string = ""
    if num % 3 == 0:
        string = string + "Fizz"
    if num % 4 == 0:
        string = string + "Buzz"
    if num % 4 != 0 and num % 3 != 0:
        string = string + str(num)
    print(string)
Though incredibly similar to its regular conditional loop counterpart, the string concatenation method is another really great way to solve this problem. Of course, this method is also all but too similar to the conditional method. The significant difference here is that the conditionals are simply going to be affecting a small sequence of characters put into the string data-type.
for num in range(1,21):
 string = “”
 if num % 3 == 0:
 string = string + “Fizz”
 if num % 5 == 0:
 string = string + “Buzz”
 if num % 5 != 0 and num % 3 != 0:
 string = string + str(num)
 print(string)
3.ITERTOOLS
Another way we could approach this problem — as well as other iteration problems — is to use the standard library tool,itertools. This will create a loop with better performance than most other iteration methods. Itertools can be thought of as an iteration library that is built to mirror several other extremely performant libraries from other languages, except using pythonic methods for solving problems.
Itertools will need to be imported, however, it is in the standard library. This meanspipwon’t be necessary, but itertools is still considered a project dependency. We are going to utilize three different methods from this module:
cycle():Cycle is a function takes a basic data-type and creates an iterator out of it. This function is useful and makes building custom iterators incredibly easy in Python.
count():Count is another generator that iterates a range. This iterator is often called an “infinite iterator,” which basically means that the count() function could essentially loop on and on forever.
islice(): The islice function is short for “iteration slice.” We can use this iterator to cut out particular elements in a data structure and iterate them.
Combining these methods will allow us to create a new function where we can solve the FizzBuzz problem without using the typical iteration methods in Python that we might be used to.
import itertools as its
def fizz_buzz(n):
    fizzes = its.cycle([""] * 2 + ["Fizz"])
    buzzes = its.cycle([""] * 4 + ["Buzz"])
    fizzes_buzzes = (fizz + buzz for fizz, buzz in zip(fizzes, buzzes))
    result = (word or n for word, n in zip(fizzes_buzzes, its.count(1)))
    for i in its.islice(result, 100):
        print(i)
The benefits of using this methodology is that the itertools library’s methods of iteration are typically going to be a lot faster than the pythonic methods of iteration. While itertools is still pythonic, it is likely that the speed of iterative looping is going to improve when using this library over the typical for loop in Python. Needless to say, creating a faster algorithm than any other applicant could certainly put you on the map for getting the job. This is a valuable module and application of the module for programmers who are still searching for employment.
A tutorial on how to solve FizzBuzz in Python. | Video: Programming with Mosh
4.LAMBDA
Another method we could use to solve this problem is even more Pythonic of a solution, and it makes use of Python’s bridge to scientific computing,lambda. There are a lot of standard functions that can be used with these lambda expressions, and they certainly come in handy. One of the most frequently used methods in this regard is themap()method. This method is going to take an expression that we can create using lambda as well as an iterative data structure.
print(*map(lambda i: 'Fizz'*(not i%3)+'Buzz'*(not i%5) or i, range(1,101)),sep='\n')
For this example, I used the range generator, and the “not” keywords in order to reverse the polarity of the modulus operators usage.
With all of these new ways to solve the problem, you might be wondering which one you should use. Of course, there are going to be trade-offs between the solutions, but in order to really make a great impression, we could narrow our decision down to using either the lambda method or the itertools method.
The lambda method has the advantage of being incredibly concise. However, depending on what code the map() method uses for iteration, it might trail behind the itertools method in terms of speed due to its less efficient iteration. The only way to figure out whether or not this is the case is to run some tests and compare our interpreter return times. So, that is going to be the mission between comparing these two heaps of code. In order to facilitate this comparison, I am going to be using theIPython magicin-line command,%timeit. Let’s start by trying it out on the itertools method. Since I wrote this as a function earlier, I can simply time the function call:
%timeit fizz_buzz(101)
Timed results for FizzBuzz using itertools. | Image: Emmett Boudreau
We will do the same with the lambda method:
%timeit print(*map(lambda i: 'Fizz'*(not i%3)+'Buzz'*(not i%5) or i, range(1,101)),sep='\n')
Timed results for FizzBuzz using the lambda method. | Image: Emmett Boudreau
Just as I predicted, the itertools method came in just a little faster, while the lambda method lagged slightly behind losing less than a millisecond off of the overall interpretation time. The answer here is somewhat of a mixed bag because the concise nature of the lambda expression andmap()function in tandem make the lambda method appear to be a lot more impressive. But the compile time of the itertools method is most certainly impressive because of its speed.
As is often the case in programming, there are multiple ways to do one thing, and as is also often the case, some ways are significantly better than others. There are certainly some trade-offs depending on what methodology you select, but this is what defines your own style as a programmer. I believe regardless of the decision that is made, using these faster methods will almost certainly make any aspiring programmer look a lot more proficient in their take home assignment. Furthermore, any aspiring programmer could certainly learn a lot more about programming and the language they are programming in by trying out different methods of doing the same thing.
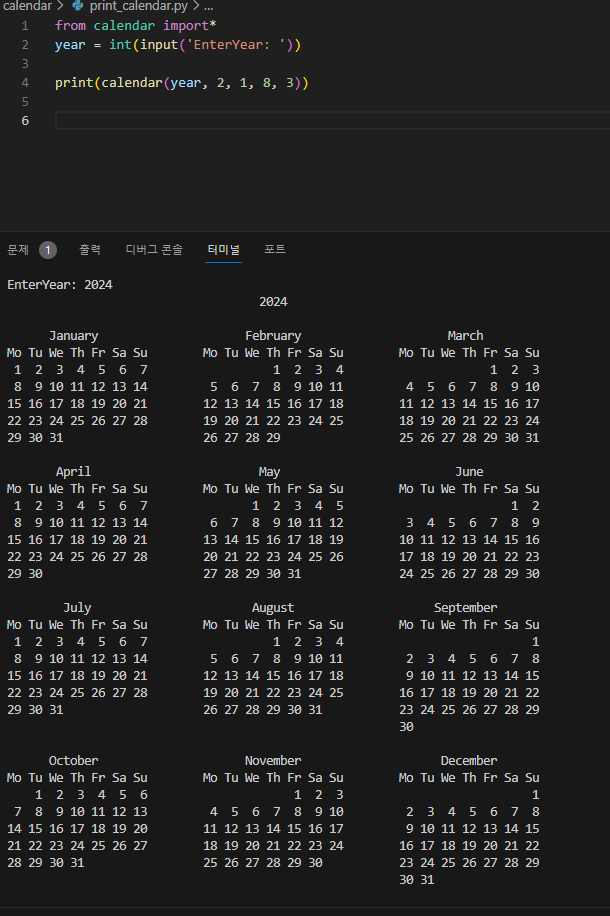
from calendar import*
year = int(input('EnterYear: '))

print(calendar(year, 2, 1, 8, 3))

#2 = 2 characters for days (Mo, Tu, etc)
#1 = 1 line (row) for each week
#8 = 8 rows for each month
#3 = 3 columns for all months of the year.
PyWhatKit은다양한 유용한 기능을 갖춘 Python 라이브러리입니다.사용하기 쉽고 추가 설정이 필요하지 않습니다.현재 WhatsApp 및 YouTube 자동화를 위한 가장 인기 있는 라이브러리 중 하나입니다.새로운 기능과 버그 수정이 포함된 새로운 업데이트가 자주 출시됩니다.
PyWhatKitis a Python library with various helpful features. It's easy-to-use and does not require you to do any additional setup. Currently, it is one of the most popular library for WhatsApp and YouTube automation. New updates are released frequently with new features and bug fixes.
import pywhatkit as kit
import datetime
import time

# Replace these values with your own
phone_number = "+1234567890"  # Include the country code without '+' or '0'
message = "Hello, this is a test message!"

# Set the time to send the message (24-hour format)
hour = 12
minute = 0

# Get the current time
now = datetime.datetime.now()
current_hour = now.hour
current_minute = now.minute

# Calculate the delay in seconds until the specified time
delay_seconds = ((hour - current_hour) * 60 + (minute - current_minute)) * 60

# Wait until the specified time
if delay_seconds > 0:
    print(f"Waiting for {delay_seconds} seconds until {hour}:{minute}")
    time.sleep(delay_seconds)


# Send the WhatsApp message
kit.sendwhatmsg(phone_number, message, now.hour, now.minute + 1)  # Adding 1 minute to the current time

print("Message sent successfully!")