Imagine a delicious pizza as your complex project. To understand how feature slicing works, let’s break it down slice by slice: easy to manage and delicious (to maintain)! 🍕
I will repeat what I said in my previous medium stories. This will be a long (because why not 😇) and maybe a little difficult to understand article. But once you read it and understand it perfectly, you will now be a10x frontend developer. 😎 Let’s take your coffee. ☕️ If you don’t drink enough coffee, it will take you longer to become a 10x developer. 😅
I like to simplify web and mobile applications by dividing them into smaller parts called feature sets. Each feature set has its own user interface, business logic, and data layer, making it easier to handle. This method, calledFeature-Sliced Design (FSD), shares advantages with component-based approaches. What stands out to me aboutFSDis its ability to break down web and mobile applications into more manageable pieces, especially focusing on user-centric features.
Structure
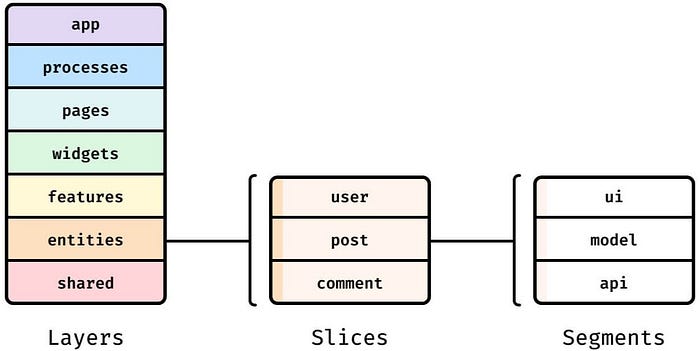
FSD methodology is built onthreeabstraction levels:layers, slices, and segments.
Layers and Slices
Imagine your app as a deliciouspizza. 🍕 (As a developer working atDomino’s, it is my natural right to use the pizza analogy. 😎)
1. Shared Layer (The Pantry):
Ingredients for everyone:Holds reusable components, utilities, hooks, and services that multiple slices can access. (Think of it as the shared kitchen where everyone can grab common ingredients and tools.)
Examples: -Common UI elements likebuttons,forms,modalsandnavigation bars(think of them as pre-cut veggies and cheese) -Utility functions for data formatting or validation (like a sharp pizza cutter) -Global state management solutions like Redux, Zustand, Tanstack Query (the recipe book for consistency)
2. Processes Layer (The Kitchen Staff):
The hardworking chefs:Handles background tasks and data fetching, keeping the pizza kitchen running smoothly. (Think of them as the pizza chefs who prepare the dough, sauce, and toppings, and coordinate the baking process.)
Examples: -Fetching pizza orders from the online system -Sending notifications when pizzas are ready -Syncing data with the delivery drivers
3. Features Layer (The Pizza Slices):
Independent and self-contained:Each slice encapsulates a specific feature, with its own UI, logic, and data, like individual pizza slices with their toppings.
Examples: - “Order Pizza” slice:Handles pizza selection, customization, and checkout (pepperoni, mushrooms, extra cheese,sucuk-sausage- you name it!) - “Track Order” slice:Displays order status and estimated delivery time (like a pizza tracker) - “Review Pizza” slice:Allows customers to rate and comment on their experience (a feedback form for the chef)
4. App Layer (The Pizza Chef):
The head chef:Oversees the entire pizza-making operation, deciding which slices to bake and how to present them to customers. (Think of it as the master chef who designs the menu, creates new recipes, and ensures each pizza is cooked to perfection.)
5. Pages Layer (The Pizza Display):
Arranges the slices:Composes slices into meaningful page layouts, like arranging pizza slices on a platter or delivery carton box.
Examples: - Homepage:Combines “Featured Pizzas” and “Order History” slices - My Account:Includes “Personal Information” and “Order Preferences” slices
6. Widgets Layer (The Spices):
Optional flavor enhancers:Small, reusable UI components that can be sprinkled across slices or pages/screens, like adding extra seasoning to your pizza.
Examples: -Search bar (for finding your favorite pizza quickly) - User notification panel (alerting you when your pizza is ready) - Modal dialogs (for special requests or confirmations)
5. Entities Layer (The Raw Ingredients):
Building blocks of data:Represents core business entities, like the flour, yeast, and toppings in a pizza.
Examples: -User entity (storing customer details) - Pizza entity (defining pizza types and ingredients) - Order entity (tracking order information)
Key points to remember:
Each layer has a clear responsibility and dependency direction.
Slices can communicate with each other using well-defined contracts, like pizza slices sharing a common crust.
The goal is to create modular, independent, and easily testable slices, making your “pizza” codebase more manageable and delicious!
Additional pizza analogy notes:
The kitchen staff (processes)work behind the scenes, preparing ingredients and ensuring a smooth pizza-making process.
The pizza chef (app)is the mastermind, orchestrating the creation of different pizzas (features) and deciding how to serve them up (pages).
The raw ingredients (entities)are essential for any pizza, but they’re not always visible to the customer — they’re the foundation that makes everything else possible.
Segments (The Toppings):
The ingredients within a slice:While a slice is a complete feature, it’s often made up of smaller parts, called segments. These are like the individual toppings that make up a pizza slice.
Focused on specific tasks:Each segment has a clear responsibility within its slice, like handling a particular UI element, data operation, or piece of logic.
Examples:
Within the “Order Pizza” slice: - “Pizza Menu” segment:Displays available pizza options and prices. - “Topping Selector” segment:Allows customers to choose their desired toppings. - “Checkout Form” segment:Collects payment and delivery information.
With a more React way:
Each slice is split into one or more of the following segments:
ui/:User Interface components and UI related logic
config/:Local configuration (constants, enums, meta information)
api/:Logic of API requests (api instances, requests, etc.)
Key points to remember:
Slices are larger, self-contained features, while segments are smaller, focused parts within a slice.
Each slice can have multiple segments, just like a pizza slice can have various toppings.
The goal is to create well-organized, modular code that’s easy to understand, develop, and maintain — like making a pizza with beautifully arranged toppings, each adding its unique flavor to the whole pie!
How about exemplifying what we have read so far in code?
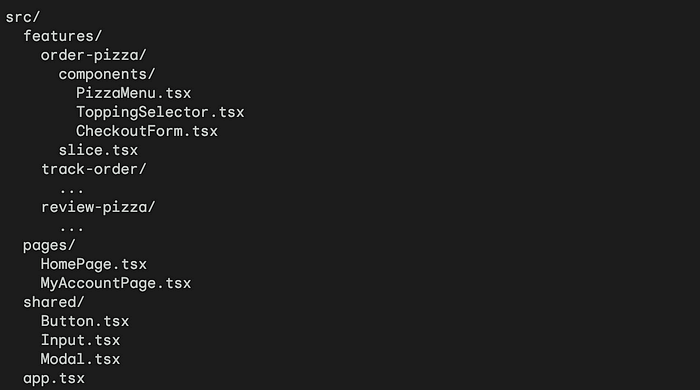
1. Folder Structure (The Pizza Kitchen Organization):
// features/order-pizza/components/PizzaMenu.tsx
import React from 'react';

interface PizzaMenuProps {
  // ... pizza options
}

const PizzaMenu: React.FC<PizzaMenuProps> = ({ /* ...props */ }) => {
  // ... fetch pizza options and display them

  return (
    <ul>
      {/* List of pizza options */}
    </ul>
  );
};

export default PizzaMenu;
4. Homepage (The Pizza Display Counter):
Feature-Sliced Design (FSD)is like slicing that pizza into neat, individual pieces, each with its own toppings and flavor. Here’s thegoodandnot-so-goodof this approach:
Clear folder structure:Each slice has its own folder, keeping its components and logic organized.
Independent slices:Each slice can be developed and tested independently, like a self-contained pizza.
Reusable components:Shared components (buttons, inputs, etc.) can be used across slices for consistency and efficiency.
Composition within pages:Pages combine slices to create meaningful layouts, like arranging pizza slices on a platter.
Remember:This is a simplified example. Real-world FSD involves more complex state management, data fetching, and communication between slices. However, this example demonstrates the core principles of organizing React apps using FSD.
The good stuff (slices):🍕
Easy to manage:Like separate pizza slices, each feature is self-contained, making code easier to understand, fix, and update. No more domino effect when changing one part!
Scales like crazy:Need more features? Just add more slices! FSD lets your app grow gracefully, adapting to new needs like adding pepperoni to your veggie delight.
Faster cooking (development):Different teams can work on separate slices at the same time, speeding up development like having multiple chefs making pizzas.
Clear ownership:Each slice has a designated “pizzaiolo,” making developers responsible for its quality and performance, similar to how each chef takes pride in their creation.
Testing made simple:Testing becomes like checking each slice for doneness, making it more focused and efficient.
The not-so-good stuff (crusts):👎🏻
Trickier planning:Slices need to work together seamlessly, like ensuring the cheese doesn’t spill over when joining them. Careful planning and communication are key to avoiding a pizza mess.
Learning curve:Newcomers might be initially confused by the distributed nature of the “pizza,” like figuring out where to find the pineapple chunks. Good documentation is essential to help them navigate.
Extra effort for teamwork:Ensuring communication and smooth connections between slices takes time and attention, like coordinating the chefs to build the perfect pizza together.
Potential redundancy:Sometimes, two slices might have similar ingredients, like having both mozzarella and ricotta. Careful planning and shared resources can help avoid unnecessary duplication.
Limited tools:FSD is still relatively new, so finding tools specifically designed for it might be like searching for a pizza cutter shaped like a unicorn. It might require some extra effort at first.
The decision:
FSDis like a great strategy for large and complex apps, but it’s not a one-size-fits-all recipe. Consider your project’s size, team, and development environment before diving in. Remember, even the most delicious pizza can be tricky to make if you don’t have the right skills and ingredients!
Navigating the vast realm of app development, choosing the best Flutter IDE can be a game-changer. Integrated Development Environments (IDEs) are more than just tools; they are the backbone that streamlines the coding process, ensuring flawless execution and enhanced productivity.
Especially when it comes to Flutter, a leading framework in today’s digital ecosystem, having the best IDE for web development elevates the developer’s experience to new heights.
Understanding Flutter and Integrated Development Environments Flutter, an open-source UI software development toolkit birthed by Google, has swiftly risen as a dominant force in mobile app development. With its unique ability to craft high-fidelity, natively compiled applications for multiple platforms from a single codebase, Flutter presents developers with unparalleled flexibility and efficiency. Its vibrant widget-centric approach, paired with the Dart language, promises robust and visually appealing applications, be it for mobile, web, or desktop.
Integrated Development Environments (IDEs) serve as the crucible where the magic of Flutter comes alive. These sophisticated platforms offer a consolidated workspace, combining essential tools like code editors, debuggers, and compilers. In the context of Flutter, the right IDE can simplify the coding process, provide real-time feedback, and automate repetitive tasks. By easing navigation, highlighting errors, and offering intelligent code completion suggestions, IDEs empower developers to harness the full potential of Flutter, ensuring smooth and efficient project outcomes.
Key Considerations When Choosing a Flutter IDE Here are some key things that you need to consider before pitching for the best Flutter IDE:
1. Hardware and Software Compatibility:
Flutter IDE for Android: Ensure support for Android emulators and tools specific to the Android ecosystem. Flutter IDE for Windows: Must be optimized for Windows with seamless integration of its features. 2. Performance and Speed of the IDE:
Opt for an IDE that is agile and responsive. The speed at which it can compile, run, and debug Flutter code is pivotal in enhancing development efficiency.
3. Availability of Support and Community Plugins/Extensions:
A robust library of plugins and extensions, backed by an active community, can be game-changing. These additions can introduce functionalities, streamline specific processes, or offer tools tailored to niche requirements.
4. Cost Factors and Licensing:
Sometimes, premium IDEs, despite an upfront cost, can offer unparalleled features, superior support, and regular updates. It’s also crucial to understand the licensing agreements. Some might be free for personal use but require payment for commercial projects.
Best Flutter IDEs For App Development VS Code Visual Studio, often dubbed the titan of IDEs, is Microsoft’s premier development environment, revered for its adaptability across various programming landscapes. For Flutter enthusiasts, it unfolds as a haven, integrating seamlessly with the framework and facilitating an optimized coding experience, ensuring rapid, efficient app development.
Features Seamless integration with Git: No more hopping between platforms. Visual Studio embeds Git functionality within, streamlining version control and ensuring smooth code management. Live Share: Elevate the collaborative experience with real-time coding sessions. Whether you’re mentoring a junior developer or debugging with a colleague across the globe, Live Share makes it effortless. IntelliCode: Leveraging artificial intelligence, IntelliCode revolutionizes coding with predictive suggestions. It not only speeds up the development process but also reduces the chances of errors. Extensive extensions marketplace: Personalize your Flutter web development experience. With a vast repository of extensions like the Pieces for Developers VS Code extension, you can add tools, themes, and languages tailored to your needs. Integrated debugging tools: Dive deep into your code with precision. Visual Studio’s debugging suite is adept at swiftly identifying and rectifying anomalies, ensuring your Flutter apps run flawlessly. Android Studio Android Studio stands as the official IDE for Android development. Its stature is further elevated when it collaborates with Flutter, offering an ecosystem that is both intuitive and powerful. For developers diving into the Flutter world, Android Studio becomes a natural ally, bringing Google’s native Android expertise and fusing it with Flutter’s dynamic capabilities.
Features Emulator with real-time preview: Say goodbye to guesswork. With its integrated emulator, developers can see changes in real time, ensuring the app looks and functions as intended. Full suite of profiling tools: Dive deep into your app’s performance metrics. From memory usage to CPU cycles, Android Studio’s profilers provide insights to optimize and enhance app responsiveness. Code completion and powerful debugging: Coding in Flutter becomes a breeze thanks to intelligent code suggestions and a robust debugger that quickly pinpoints and rectifies issues. Flutter-specific widget inspector: Understand and modify your Flutter widgets effortlessly. This specialized inspector visualizes and debugs the widget tree, simplifying UI adjustments. Fast build and deploy processes: Time is of the essence. Android Studio accelerates the build and deployment phases, ensuring swift transitions from coding to testing. DartPad Floating in the digital ether is DartPad, a minimalist yet potent online IDE tailored for the Flutter and Dart communities. It breaks down barriers by being accessible directly via a browser, making it an invaluable tool for quick coding experiments or when on the go. For those seeking a no-fuss, immediate Flutter coding environment, DartPad emerges as an impeccable choice.
Features Web-based with no installation required: Website accessibility is its middle name. DartPad requires no downloads or setups, offering a hassle-free, instant coding platform anytime, anywhere. Live preview feature: Witness your Flutter magic in real time. As you code, DartPad dynamically displays the results, aiding in immediate feedback and iterations. Supports Dart and Flutter libraries: Despite its lightweight nature, DartPad doesn’t skimp on essentials. It offers comprehensive support for Dart and Flutter libraries, ensuring a rich coding experience. Shareable code snippets: Collaboration is critical. Whether you want to share a piece of brilliance or seek feedback, DartPad’s shareable snippets make it effortless. Simple and intuitive interface: DartPad prides itself on its clean design. With an uncluttered interface, developers can focus purely on coding, free from distractions. IntelliJ IDEA In the grand tapestry of development environments, IntelliJ IDEA by JetBrains stands out as a multifaceted gem. Its prowess extends seamlessly to Flutter development, offering intuitive features and advanced capabilities. For those who prioritize depth in their coding assistance without compromising on efficiency, IntelliJ IDEA proves to be an indispensable ally in the Flutter domain.
Features Deep code understanding: Venture beyond the surface. IntelliJ IDEA delves into the semantics of your code, offering insights and suggestions that align with best practices and design patterns. Smart code completion: Efficiency at your fingertips. As you type, the Intellij IDE proactively offers code suggestions, streamlining the coding process and minimizing potential errors. Powerful code refactoring tools: Embrace change without fear. With robust refactoring capabilities, adapting and enhancing your Flutter codebase becomes a structured and error-free process. Built-in tools for profiling: Gauge the pulse of your application. IntelliJ IDEA’s profiling tools shed light on performance metrics, enabling optimizations and fine-tuning. Version control integration: Manage your code evolution with grace. Integrated version control ensures smooth transitions between code versions, collaborative coding, and well-maintained coding history. Flutlab In the dynamic arena of online IDEs, Flutlab emerges as a beacon for cloud-based Flutter development. Harnessing the power and flexibility of cloud technology, it reshapes the conventional boundaries of coding, offering a streamlined and accessible platform. For a Flutter developer seeking a seamless Flutter IDE online without the constraints of hardware or location, Flutlab unfolds as an impressive choice.
Features Real-time collaboration: Teamwork made simple. Flutlab facilitates synchronized coding sessions, allowing multiple developers to collaborate on projects, ensuring seamless teamwork and immediate feedback. Cloud-based simulator: Say goodbye to hefty local emulators. Test Flutter web applications directly within the browser using Flutlab’s efficient cloud simulator, saving time and system resources. Integration with popular repositories: Seamlessly connect with platforms like GitHub or Bitbucket. This integration ensures fluid code pulls, pushes, and version management. Direct APK download: Transition from development to testing in a snap. With Flutlab, developers can directly download the APK, facilitating swift app testing and deployment. Code analysis and debugging: Navigate the maze of code with precision. Flutlab’s tools offer insightful code analysis and a potent debugger, ensuring your Flutter apps are robust and error-free. XCode Diving into Apple’s ecosystem, XCode stands tall as the definitive development environment for those keen on reaching the iOS audience through Flutter. Seamlessly merging the robustness of Apple’s software architecture with Flutter’s adaptability, it crafts an unparalleled development experience.
Features Advanced debugging and profiling tools: With XCode, troubleshooting is elevated to an art form. Its suite of tools provides deep insights, ensuring your Flutter apps run optimally on iOS devices. Interface Builder: Envision and create dynamic Flutter UI with ease. The XCode Interface Builder offers a visual canvas, making UI/UX design intuitive and efficient. On-device testing support: Witness your creations in their natural habitat. Test directly on iOS devices to ensure performance and responsiveness. Asset management: Organize and manage multimedia with finesse. XCode’s asset catalog aids in streamlined resource utilization. Swift and C integration: While Flutter reigns supreme, the XCode IDE allows seamless integration with Swift and C, broadening developmental horizons. FlutterFlow Making its mark in the Flutter landscape is FlutterFlow, a revolutionary visual development platform. Eliminating traditional barriers, it provides a canvas where even non-coders can bring Flutter applications to life.
Features Drag-and-drop UI builder: Designing made simple. Sculpt interfaces without diving into code, making development swift and accessible. Firebase integration: Connect with Firebase effortlessly, enhancing functionalities like authentication, databases, and more. Real-time previews: Iterate with confidence. See changes as you make them, ensuring design perfection. Robust component library: A treasure trove of widgets and elements catering to diverse design needs. Collaboration and versioning features: Team up and maintain code history with precision, streamlining project management. Emacs Dart Mode For purists who find solace in Emacs, the Dart Mode extension brings Flutter to their fingertips. Merging the efficiency of Emacs with Flutter’s dynamism it offers a refined coding experience.
Features Syntax highlighting: Navigate code effortlessly with distinct color codes for better readability. Code formatting: Maintain a pristine codebase with automatic formatting, ensuring consistency. Integration with Dart SDK: Access Dart’s full potential seamlessly within the Emacs environment. Quick documentation access: Answers are just a keystroke away. Dive into Dart and Flutter documentation on the fly. Keyboard-centric commands: Embrace the power of keyboard shortcuts, enhancing coding speed and efficiency. RevenueCat While not a conventional IDE, RevenueCat is a vital tool for developers integrating in-app purchases and subscriptions in their Flutter apps. Simplifying the maze of monetization, it’s a catalyst for revenue generation.
Features Simplifies in-app billing: Navigate the intricacies of billing with ease, enhancing user experience and purchase success rates. Tracks revenue and metrics: Gauge your success. Monitor key metrics to strategize and optimize monetization. Supports multiple platforms: Not just limited to Flutter, RevenueCat’s broad platform support ensures consistent monetization strategies. Robust API: It offers ease and flexibility thanks to its robust API integration. Integrate with comfort and flexibility, leveraging RevenueCat’s powerful API. Atom Atom, an avant-garde text editor birthed by GitHub, extends its arms to Flutter developers through community-driven extensions. Marrying simplicity with adaptability, it emerges as a formidable environment for Flutter projects.
Features Git integration: With its roots in GitHub, Atom offers seamless Git operations, streamlining code management. Autocompletion for Flutter: Speed up your coding. Atom suggests code snippets, enhancing your Flutter coding rhythm. Embedded terminal: Access the terminal within the editor, streamlining tasks without switching windows. Smooth UI with themes: Personalize your workspace. With a vast array of themes, craft an environment that resonates with your aesthetic. The Main Benefits of IDEs & Text Editors for App Development Streamlined development cycle. Comprehensive code management. Integrated testing and debugging. Enhancing collaboration and productivity. Customization and extension support. Conclusion Choosing the best IDE for Flutter is pivotal, acting as the linchpin between ideas and execution. A Flutter IDE directly influences productivity, ensuring app development is both efficient and yields superior quality outcomes. Want to learn about how Pieces built their app? Read Pieces’ Flutter case study.
There are many HTML attributes, in addition to some basic attributes, there are many useful and particularly powerful attributes;
This article will introduce 24 powerful HTML attributes that can make your website more dynamic and interactive, and make users feel more comfortable and happy.
Let’s explore these 24 powerful HTML attributes together!
1. Accept
The Accept attribute is used to specify a list of MIME types that the browser can handle.
Tips:
A MIME type is a standard for identifying the type of document,
For example, text/html represents an HTML document, image/jpeg represents a JPEG image, and so on.
By including the Accept attribute in the HTTP request header, the browser can tell the server which MIME types it can accept in response. Based on this information, the server can choose the most appropriate response type and return it to the browser. The value of the Accept attribute is a comma-separated list of MIME types, wildcards can be used to represent a class of MIME types, for example text/* represents all text types.
2. Autofocus
The Autofocus property is used to automatically set the focus to the specified element when the page loads.
Tips:
Autofocus attributes can be applied to various HTML elements such as text boxes, buttons, drop-down lists, and more.
In HTML5, the Autofocus attribute can omit the attribute value, indicating that the focus is set to the first element with the Autofocus attribute.
When the page is loaded, if there is an element with the Autofocus attribute, the browser will automatically focus the cursor on the element, so that the user can directly interact with the element without manually clicking or using the Tab key to switch focus.
3. Input mode
The Inputmode attribute is an attribute for specifying the type of content entered in the text box.
It can help the browser to better optimize the input experience, such as automatically popping up the appropriate virtual keyboard on mobile devices.
text: The default value, which means input any text.
none: indicates that no input is required.
tel: Indicates to enter a telephone number.
url: Indicates the input URL address.
email: Indicates to enter an email address.
numeric: Indicates the input number.
decimal: Indicates inputting a number with a decimal point.
search: Indicates to enter a search keyword.
The level of support for the Inputmode attribute may vary in different browsers.
Therefore, compatibility testing is required when using the Inputmode property.
4. Pattern
The Pattern attribute is a regular expression pattern used to specify the input content in the text box. It can help the browser to verify whether the content entered by the user conforms to the specified format requirements.
If the content entered by the user does not conform to the regular expression pattern specified by the Pattern attribute, the browser will display a default error message.
Tips:
The value of the Pattern attribute must be a valid regular expression.
The Pattern property can only be applied to elements that can enter text, such as text boxes, text fields, and password boxes.
The Pattern attribute will not prevent users from entering illegal characters, but will verify that the input content meets the specified format requirements when submitting the form.
The error message of the Pattern attribute can be customized using the title attribute.
The Pattern attribute is usually used together with the required attribute to ensure that the content entered by the user conforms to the specified format requirements and is not empty. For example, you can use the Pattern property to validate user input for zip codes, phone numbers, email addresses, and so on.
5. Required
The Required attribute is an attribute used to specify whether a form element is required.
If a form element has the Required attribute set, then when the form is submitted, if the value of the element is empty, the browser will prevent the form from being submitted and prompt the user to fill in the field.
Tips:
The Required attribute can only be applied to form elements, not to other HTML elements.
The Required attribute does not verify whether the content entered by the user meets the specified format requirements, only whether the element is empty.
The Required attribute does not prevent users from submitting spaces or whitespace characters, so some other means of validating user input is required.
The Required attribute can be used together with the Pattern attribute to verify that the user-entered content conforms to the specified format requirements.
The Required attribute can be used in conjunction with the Autofocus attribute to ensure that when the user enters the form page, the focus is automatically on the required field.
The Required attribute is often used with the type attribute of form elements, such as text boxes, drop-down lists, radio boxes, check boxes, and so on.
6. Autocomplete
The Autocomplete attribute is an attribute used to specify whether the form element has auto-complete enabled.
Autocomplete helps users fill out forms faster and reduces the chance of typing errors.
Tips:
on: The default value, which means that the auto-completion function is enabled.
off: Indicates that the auto-completion function is disabled.
name: Indicates that the name attribute of the form element is used as the keyword for automatic completion.
email: Indicates to use the most recent email address entered by the user as the autocomplete keyword.
username: Indicates that the user name recently entered by the user is used as the keyword for auto-completion.
current-password: Indicates that the password recently entered by the user is used as the keyword for auto-complete.
new-password: Indicates that the new password recently entered by the user is used as the keyword for auto-complete.
tel: Indicates to use the last phone number entered by the user as the keyword for autocomplete.
address-level1: Indicates that the country or region name recently entered by the user is used as the keyword for auto-completion.
address-level2: Indicates that the province or state name recently entered by the user is used as the keyword for auto-completion.
address-level3: Indicates that the city or region name recently entered by the user is used as the keyword for auto-completion.
address-level4: Indicates that the most recent street name entered by the user is used as the keyword for auto-completion.
country: Indicates that the country name recently entered by the user is used as the keyword for auto-complete.
The degree of support for the Autocomplete attribute may vary in different browsers. Therefore, compatibility testing is required when using the Autocomplete property.
7. Multiple
The Multiple attribute is an attribute used to specify whether a form element allows multiple selections.
The Multiple attribute is typically applied to form elements such as dropdown lists, file uploads, and checkboxes.
Tips:
The Multiple attribute can only be applied to form elements such as drop-down lists, file uploads, and check boxes, and cannot be applied to form elements such as radio boxes and text boxes.
The value of the Multiple property must be a Boolean value, true or false.
The default value of the Multiple attribute is false, which means that multiple selections are not allowed.
When the value of the Multiple attribute is true, the drop-down list will be displayed as a multi-selectable list box, the check box will be displayed as a multi-selectable check box list, and the file upload will allow the user to select multiple files.
When using the Multiple attribute, it is necessary to process the multi-selected values in the background program, for example, use an array to store the multi-selected values.
If a form element has the Multiple attribute set, the user can select multiple options, not just a single one.
8. Download
The Download attribute is an attribute for specifying a file name when a link downloads a file.
If a link is set with the Download attribute, then when the user clicks the link to download the file, the browser will save the file locally and use the file name specified by the Download attribute to name the file.
Tips:
The value of the Download attribute can be any string, which represents the file name used when downloading the file.
The Download attribute can only be applied to tags, not to other HTML elements.
The Download attribute doesn’t change the actual name of the file, it just uses the specified filename when downloading.
The value of the Download attribute can be dynamically generated, for example using JavaScript to generate the filename.
When using the Download attribute, you need to ensure that the downloaded file is legal and does not violate the copyright and privacy of others.
The Download attribute is usually used in tags to download PDF, image, audio, video and other files.
9. Content editable
The Contenteditable attribute in HTML is an attribute used to specify whether an element is editable.
Tips:
The value of the Contenteditable attribute can be true, false or inherit.
The default value of the Contenteditable property is false, indicating that the element is not editable.
When the value of the Contenteditable property is true, the element is editable.
When the value of the Contenteditable attribute is inherit, the editability of the element is inherited from the parent element.
The Contenteditable attribute does not change the default behavior of the element, eg tags can still jump to other pages.
When using the Contenteditable attribute, you need to pay attention to security issues to avoid XSS attacks and malicious script injection.
If an element sets the Contenteditable attribute, then the user can enter text, insert pictures, modify styles, etc. in the element. The Contenteditable attribute is usually applied to, and other elements are used to implement functions such as rich text editors and editable tables.
10. Readonly
The Readonly attribute in HTML is an attribute used to specify whether a form element is read-only.
Tips:
The value of the Readonly attribute must be a Boolean value, true or false.
The default value of the Readonly attribute is false, indicating that the form element is editable.
When the value of the Readonly attribute is true, the form element is read-only.
The Readonly attribute does not prevent users from modifying the value of form elements via JavaScript.
The Readonly attribute is different from the Disabled attribute, which disables the form element so that it cannot submit data.
When using the Readonly attribute, it is necessary to process the read-only value in the background program, such as using a hidden field to store the read-only value.
If a form element has the Readonly attribute set, the user can see the value of the element, but cannot modify the value of the element. The Readonly attribute is usually applied to form elements such as text boxes, drop-down lists, and date pickers to display data or prevent users from modifying data.
11. Hidden
The Hidden attribute is an attribute used to specify whether an element is hidden.
Tips:
The value of the Hidden property must be a Boolean value, either true or false.
The default value of the Hidden property is false, indicating that the element is not hidden.
When the value of the Hidden property is true, the element is hidden.
The Hidden attribute is different from the display:none attribute of CSS. The display:none attribute will completely remove the element from the page, and the element cannot be accessed through JavaScript or other methods.
When using the Hidden attribute, the hidden value needs to be processed in the background program, such as using a hidden field to store the hidden value.
If an element has the Hidden attribute set, the element will not be displayed on the page, but it still exists on the page and can be accessed through JavaScript, etc. The Hidden attribute is usually applied to elements such as form elements, buttons, images, etc., to pass data or control page behavior without affecting the page layout.
12. Spellcheck
The Spellcheck attribute in HTML is an attribute used to specify whether to enable spell checking for an element.
Tips:
The value of the Spellcheck property must be a Boolean value, true or false.
The default value of the Spellcheck attribute is false, indicating that the element does not enable spell checking.
When the value of the Spellcheck attribute is true, the element enables spell checking.
The extent of support for the Spellcheck attribute varies by browser, and different browsers may have different spellcheck algorithms and dictionaries.
When using the Spellcheck attribute, you need to pay attention to security issues to avoid XSS attacks and malicious script injection.
If an element sets the Spellcheck attribute, then when the user enters text in the element, the browser will automatically check for spelling errors and display a red wavy line under the incorrect word. The Spellcheck attribute is usually applied to elements such as text boxes and text fields to improve the accuracy of user input.
13. Translate
The Translate attribute in HTML is an attribute used to specify whether an element should be translated.
Tips:
The value of the Translate attribute must be a Boolean value, yes or no.
The default value of the Translate property is yes, indicating that the element needs to be translated.
When the value of the Translate attribute is no, the element does not require translation.
The degree of support for the Translate property varies from browser to browser, and different browsers may have different translation algorithms and dictionaries.
When using the Translate attribute, you need to pay attention to security issues to avoid XSS attacks and malicious script injection.
If an element has the Translate attribute set, the browser will decide whether to translate the content of the element according to the value of the attribute. The Translate attribute is usually used in multilingual versions of websites to control which elements need to be translated and which elements do not.
14. Loading
The attribute in HTMLloadingis a new attribute that can be used to specify the browser's priority when loading resources.
This attribute can be applied to tags such as<img>,<iframe>,<script>,<link>and<audio>.
Tips:
lazy: Indicates that the resource should be lazily loaded after the page loads. It's the default value.
eager: Indicates that the resource should be loaded immediately on page load.
auto: Indicates that the browser should decide when to load the resource by itself.
loadingAttributes are not supported by all browsers, so a compatibility check is required when using them.
15. Onerror
onerroris a JavaScript event handler that fires on JavaScript errors.
onerrorEvent handlers can be addedwindowto objects to catch JavaScript errors globally.
Tips:
message:wrong information.
source: The URL of the script where the error occurred.
lineno: The line number where the error occurred.
colno: The column number where the error occurred.
error: An Error object containing detailed information about the error.
onerrorEvent handlers can only catch JavaScript errors that are not caught by other error handlers.
It is best to use try-catch statements in your code to catch and handle JavaScript errors.
16. Poster
posteris an attribute of the HTML5<video>tag that specifies an image to display before the video loads and before it plays.
Tips:
posterAttributes only apply to<video>tags, not<audio>labels.
It is commonly used to provide a preview image or thumbnail of a video.
17. Controls
controlsIs an attribute of the neutral tag in HTML5<video>,<audio>which is used to specify whether to display the controls of the media player.
Ifcontrolsthe property is set tocontrols, controls are displayed on the media player, such as a play/pause button, volume control, progress bar, etc.
<!DOCTYPE html>
<html>
<head>
<title>Controls Example</title>
</head>
<body>
<video width="320" height="240" controls>
<source src="video.mp4" type="video/mp4">
<source src="video.ogg" type="video/ogg">
Your browser does not support the video tag.
</video>
</body>
</html>`
controlsAttributes are only available in browsers that support HTML5. If the browser does not support HTML5, the control will not be displayed.
18. Autoplay
autoplayis an attribute of the neutral tag in HTML5<video>that<audio>specifies whether the media should play automatically on page load.
Ifautoplaythe property is set toautoplay, the media will play automatically on page load.
<!DOCTYPE html>
<html>
<head>
<title>Autoplay Example</title>
</head>
<body>
<video width="320" height="240" autoplay>
<source src="video.mp4" type="video/mp4">
<source src="video.ogg" type="video/ogg">
Your browser does not support the video tag.
</video>
</body>
</html>`
Autoplay can negatively impact the user experience, so useautoplayattributes with caution. In some cases, browsers may block autoplay, such as on mobile devices, where the user must first interact with the page to allow autoplay.
19. Loop
loopis an attribute of the<video>neutral<audio>tag in HTML5 that specifies whether the media should loop after playback ends.
Ifloopthe property is set toloop, the media will loop after playback finishes.
<!DOCTYPE html>
<html>
<head>
<title>Loop Example</title>
</head>
<body>
<video width="320" height="240" loop>
<source src="video.mp4" type="video/mp4">
<source src="video.ogg" type="video/ogg">
Your browser does not support the video tag.
</video>
</body>
</html>`
Looping can negatively impact the user experience, so useloopattributes with care.
20. Cite
citeis a global attribute in HTML that can be used to specify the source of the citation.
citeThe value of the attribute should be a URL pointing to the source of the reference.
Tips:
citeAttributes can be applied to tags such as<blockquote>,<q>,<del>, etc.<ins>
If the source of the referrer is not a URL,citethe value of the property can be set to a string describing the referrer.
<!DOCTYPE html>
<html>
<head>
<title>Cite Example</title>
</head>
<body>
<blockquote cite="https://www.example.com/quote">
This is a quote from an external source.
</blockquote>
<q cite="https://www.example.com/quote">
This is a short quote from an external source.
</q>
<del cite="https://www.example.com/deleted">
This text has been deleted from an external source.
</del>
<ins cite="https://www.example.com/inserted">
This text has been inserted from an external source.
</ins>
</body>
</html>
citeAttributes do not automatically create links, so if you need to create a link, you need to use<a>a tag andhrefset the attribute ascitethe value of the attribute.
21. Datetime
datetimeIs an attribute of tags in HTML<time>, used to specify the date and time.
datetimeThe value of the attribute should be a valid date and time format, egYYYY-MM-DDThh:mm:ss.
datetimeAttributes do not automatically format dates and times, so you need to use JavaScript or other tools to format dates and times.
22. Async
asyncis an attribute of the tag in HTML<script>that specifies whether the script should be loaded asynchronously.
Ifasyncthe property is set toasync, the script will be loaded asynchronously and will not block parsing and rendering of the page.
Scripts loaded asynchronously may execute before the rest of the page loads, so use with caution. This can cause errors if the script depends on other parts of the page.
23. Defer
deferis an attribute of the tag in HTML<script>that specifies whether scripts should be lazy-loaded.
Ifdeferthe property is set todefer, the script will delay loading until the page has been parsed before executing it.
<!DOCTYPE html>
<html>
<head>
<title>Defer Example</title>
<script defer src="script.js"></script>
</head>
<body>
<p>This is a paragraph.</p>
</body>
</html>
In the example above, wedeferset the property todefer, which will cause the script to be lazy loaded. In this case the script will be executed after the page has been parsed and will not block the page from loading.
24. Draggable
Draggableis an attribute in HTML5 that allows users to move elements by dragging them.draggableWhen an element is set to , the user can drag the element with the mouse or by touching the screen. When dragging an element, a series of events will be triggered, such asdragstart, ,draganddragend, and these events can be used to implement the drag-and-drop function.
과거와 달리 최근에는 자바스트립트 진영에서도 프레임워크를 이용한 개발이 필수로 여겨지고 있습니다. 2017년까지만 해도 개발자들은 프로젝트에 Angular와 React 중 어느 것을 사용해야 하는지 여부를 주로 토론했으나, 2018년 이후 Vue.js라는 새로운 프레임워크에 대한 관심이 높아지고 있는 추세입니다. 본 아티클에서는 웹 프론트엔드 영역에서 주요 라이브러리와 프레임워크로 자리잡은 React와 Vue.js, Angular의 현재 상태와 향후 전망을 살펴보겠습니다.
Angular 강력한 명령행 도구와 잘 정돈된 폴더 구조, 프로젝트 생성과 동시에 각종 환경이 한 번에 갖춰지는 등 필요한 기능을 모두 내장한 프레임워크입니다. 참고로 이렇게 애플리케이션을 만들기 위해 필요한 기능을 모두 갖춘 프레임워크를 '컴플리트 프레임워크(Complete Framework)'라고 합니다. Google이 개발한 Angular는 2010년에 처음 출시되어 가장 오래 되었습니다. 2016년에는 타입스크립트(TypeScript) 기반 프레임워크인 Angular 2가 출시되면서 실질적인 전환이 이루어졌습니다.(AngularJS라는 원래 이름에서 'JS'가 삭제됨) AngularJS(버전 1)는 여전히 업데이트를 제공하고 있지만, 본 아티클은 Angular에 대한 토론을 집중적으로 다룹니다. 최신 안정버전은 2018년 10월에 출시된 Angular 7입니다.
React 사용자의 조작에 따라 사용자 인터페이스가 동적으로 변화하는 웹 애플리케이션을 개발할 수 있게 해 주는 프론트엔드 라이브러리입니다. React는 "A JavaScript library for building user interfaces"라고 주장하며 라이브러리를 표방하고 있습니다. Facebook이 개발한 React는 2013년에 출시되었으며, Facebook은 React를 자사의 제품(Facebook, Instagram 및 WhatsApp)에서 광범위하게 사용합니다. 2018년 11월에 발표된 16.x가 최신 안정버전입니다.
Vue.js Vue.js는 이 그룹에서 가장 늦게 출시되었는데 Google 직원인 Evan You가 2014년에 개발했습니다. Vue.js는 대기업의 후원을 받지 못했음에도 지난 2년 동안 인기가 높아지고 있습니다. 현재 안정버전은 2.17이며, 2018년 8월에 출시되었습니다. Vue.js의 컨트리뷰터는 Patreon에서 지원하며, 현재 프로토타입 단계에 있는 Vue3은 타입스크립트 기반으로 이동할 계획입니다.
특징
Angular 프레임워크라는 것입니다. 최근에는 자바스크립트로 웹페이지뿐만 아니라, 스마트폰이나 데스크탑에서 동작하는 애플리케이션을 개발할 수 있는데, Angular는 이를 지원하기 위한 기능들을 갖추고 있습니다. 또한, 타입스크립트를 주력언어로 채택하여 정적 타입을 제공하고 있습니다. 정적 타입의 도입으로 코드 어시스트, 타입 체크, 리팩토링을 지원하는 강력한 도구 사용이 가능해지며, 객체지향적 프로그래밍에 적합해집니다. 이는 많은 개발자 간의 협업이 필요한 대규모 애플리케이션 개발에 보다 효과적입니다.
Angular가 제공하는 또 다른 강력한 도구는 Angular CLI입니다. 프레임워크에 익숙하지 않은 초심자들이 가장 어렵게 생각하는 장벽 중 하나인 개발환경 구축을 Angular CLI가 제공하는 명령 하나만으로 간단히 해결할 수 있습니다. 아울러 다른 프레임워크가 제공하는 CLI와는 달리 추가적인 명령들을 통해 개발환경 구축뿐만 아니라, 개발 전반에 걸쳐 편리함을 제공합니다.
그리고 Angular는 컴플리트 프레임워크에 걸맞게 Router, Forms, HTTP 등 다양한 모듈을 지원합니다. 또한 RxJS를 내장하고 있어 HTTP 뿐만 아니라 모든 이벤트를 스트림으로 RxJS의 옵저버 패턴에 의해 유연하게 제어할 수 있습니다. 그 밖에도 애니메이션을 위한 Angular Animations, 국제화를 위한 i18n 모듈, 테스팅 모듈 등도 제공하고 있습니다.
또 다른 특징으로 컴포넌트 기반 개발을 중심으로 한다는 점을 들 수 있습니다. 컴포넌트 기반으로 개발한다는 것은 컴포넌트의 형태로 사용자 인터페이스를 정의하고, 자바스크립트 파일뿐 아니라 템플릿 역할을 할 HTML 파일이나 스타일시트가 담긴 CSS 파일도 컴포넌트에 포함한다는 것입니다. 이 파일들은 컴포넌트마다 자동으로 생성됩니다.
또한 Angular는 타입스크립트의 문법인 'decorator'를 많이 활용하는 선언적 코딩 스타일을 사용합니다. 태그명, 템플릿 파일, CSS 파일에 대한 정보를 decorator 문법으로 전달하고 있습니다.
React React의 특징은 Angular와 달리 개발에 필요한 모듈을 기본으로 제공하지 않고, 서드파티(Third party) 라이브러리에 의존한다는 점입니다. 공식적으로 React는 작은 자바스크립트 UI 라이브러리일 뿐, 그 외의 것은 사용자에게 일임하고 있습니다. 대신 다른 프레임워크에 비해 방대한 에코시스템이 존재합니다. 사용자는 자유롭게 개발에 필요한 모듈을 결정하고 선택할 수 있습니다. 커다란 에코시스템은 React의 장점으로 보이지만 사용자에게 책임이라는 부담을 지우기도 합니다. 그러나 다행스럽게도 React 진영이 이러한 사용자 부담에 대해 완전히 손놓고 있지는 않습니다. Angular CLI와 마찬가지로 초심자의 빠른 개발환경 구축을 위해서 Create React App이라는 툴을 제공하여 진입 장벽을 낮추고 있습니다.
React 역시 컴포넌트 기반의 개발을 채택하고 있습니다. 그러나 컴포넌트의 구현은 자바스크립트에 조금 더 치중되어 있습니다. 다른 프레임워크들이 HTML 마크업 기반으로 그 위에 템플릿 문법을 추가해 컴포넌트의 구조와 구성요소를 정의하는 반면, React는 XML 포맷의 템플릿을 직접 자바스크립트에 내장시키는 형태로 JSX 기술을 주력으로 사용하는 것을 권장하고 있습니다. 그렇기 때문에 다른 프레임워크에 비하여 더 자바스크립트에 집중된 형태의 컴포넌트가 나타나게 됩니다.
React가 Angular와 구별되는 또 다른 특징 중 하나는 가상 DOM을 이용한다는 것입니다. 가상 DOM은 가상 트리 형태의 자료구조에 실제 DOM 트리가 매핑된 형태로 동작합니다. 전통적인 DOM은 한 요소에서 변경이 발생하더라도 전체 트리구조를 업데이트하기도 합니다. 따라서 렌더링 성능이 떨어질 수 있는 불안요소가 있습니다. 가상 DOM은 가상 DOM 내의 변경사항을 추적하여 전체 트리의 다른 부분에 영향을 주지 않고, 매핑된 실제 DOM상의 특정요소만 업데이트할 수 있게 도와 줍니다. 일반적으로 가상 DOM이 실제 DOM을 조작하는 것에 비해 성능이 뛰어나다고 볼 수 있습니다. 하지만 Angular는 실제 DOM 위에서 동작함에도 변경감지 구현 기능이 따로 존재하여 성능을 높이고 있다는 것을 참고하시기 바랍니다.
React만의 특징이 한 가지 더 있습니다. 바로 데이터 바인딩 방법입니다. 데이터 바인딩은 모델(비즈니스 로직)과 뷰(UI) 간에 데이터를 동기화하는 프로세스입니다. 기본적으로 단방향과 양방향이라는 두 가지 구현방식이 있습니다. 두 방법의 차이는 모델-뷰(Model-View) 업데이트 처리 방식입니다. 양방향 데이터 바인딩은 뷰가 변경되면 모델도 변경되며 모델이 변경되면 뷰도 변경되는 처리방식입니다. React는 단방향 데이터 바인딩을 사용합니다. 모델이 변경되면 뷰가 변경되는 방법만을 허용하고, 뷰가 변경된 경우 모델을 변경시키지 않습니다. 뷰가 변경된 경우 모델을 변경하는 코드를 작성해야 합니다. 단방향 데이터 바인딩은 일반적으로 예측 가능성이 높기 때문에 코드가 더 안정적이지만, 양방향 바인딩에 비해서 코드 작성시간이 더 필요합니다. 참고로 Angular와 Vue.js는 단방향 데이터 바인딩과 양방향 데이터 바인딩 모두 지원합니다.
Vue.js Vue.js도 React처럼 가상 DOM을 사용하고, 컴포넌트 기반 개발을 중심으로 합니다. 그러나 React와 구별되는 Vue.js만의 특징은 컴포넌트의 자바스크립트 집중도가 낮다는 점입니다. 즉 JSX를 권장하는 React와는 달리, 컴포넌트 구조와 구성요소를 작성할 때 Angular처럼 HTML 마크업 기반의 템플릿 문법을 사용합니다. Vue.js 컴포넌트 작성 시 보통 '단일 파일 컴포넌트'라는 .vue 확장자를 가지는 파일을 사용합니다. 이 파일은 HTML 마크업 기반의 템플릿 부분과 자바스크립트 부분 그리고 CSS를 작성하는 스타일 시트 부분으로 나뉩니다. React에 비해 기존 HTML, CSS에만 익숙한 웹 디자이너가 Vue.js를 접했을 때 컴포넌트 구성요소와 구조를 쉽게 이해할 수 있습니다. 따라서 React보다 기존 웹 디자이너와의 협업이 쉬워지는 장점이 있습니다.
다른 프레임워크들과 마찬가지로 Vue.js도 CLI 툴을 제공합니다. 그리고 애플리케이션 개발에 필요한 다른 모듈을 React처럼 사용자에게 책임을 맡기지 않고 가이드 문서를 통해 특정모듈을 권장하고 있습니다. Angular처럼 내장모듈로 정해진 것은 아니지만 React처럼 방임에 가깝게 두지도 않고 둘 사이를 절충한다고 볼 수 있습니다.
주목할 만한 것은 대기업 직원이 주도하고 있는 다른 프레임워크들과 달리 Vue.js는 커뮤니티가 주도하는 프레임워크라는 것입니다. 문서나 코드의 품질이 떨어질까 우려될 수도 있으나, 다행스럽게도 공식문서가 여러 나라의 언어로 잘 번역되어 있을 뿐만 아니라, 문서의 구성이 예제 위주로 되어 있어 필요한 내용만 빠르게 발췌하여 적용할 수 있습니다. 이는 진입장벽을 낮춰주는 또 다른 장점으로, React에 비해 초심자에게 비교적 접근성이 뛰어나다고 볼 수 있습니다.
프레임워크 간의 크기는 상당한 차이가 있지만 평균 웹 페이지 크기와 비교할 때는 모두 작다고 볼 수 있습니다. 또한 자주 사용하는 CDN을 사용하여 이러한 라이브러리를 로드하는 경우 이미 사용자의 로컬시스템에 라이브러리가 로드되어 있을 가능성이 높습니다.
컴포넌트
컴포넌트는 Vue.js, React, Angular 세 가지 프레임워크의 핵심적인 부분입니다. 컴포넌트는 일반적으로 입력을 받아 이를 기반으로 동작을 수행합니다. 동작 수행은 통상 페이지 전체나 일부 UI 변경으로 나타납니다. 컴포넌트를 사용하면 쉽게 코드를 재사용할 수 있습니다. 컴포넌트는 페이지 전체 혹은 일부일 수 있습니다. 페이지 전체가 컴포넌트의 트리 형태로 나타날 수 있습니다. 하나의 페이지에서 일부 컴포넌트를 가져다가 다른 페이지에서 재사용할 수도 있습니다.
Angular에서는 컴포넌트는 Directive를 이용합니다. Directive는 DOM 요소에 대한 어떠한 표시이고, Angular는 이를 통해 특정 동작을 위한 DOM을 추적하거나 DOM에 동작을 첨부할 수 있습니다. 따라서 Angular는 컴포넌트의 UI 부분을 HTML 태그와 속성으로 따로 두고, 자바스크립트 코드를 UI의 동작을 위해 따로 둡니다. 흥미롭게도 React는 UI 표현과 동작을 결합합니다. 이전에 말했다시피 React에서는 JSX 기술을 통해 자바스크립트의 코드 위주로 UI를 표현하고 그 동작을 지시합니다. Vue.js에서는 UI 표현과 동작이 모두 컴포넌트 파일의 일부이기 때문에 React와 비교할 때 더 직관적으로 작업할 수 있습니다. 또한 Vue.js는 자바스트립트 내에서도 UI의 구성요소와 동작을 결합할 수 있습니다.
학습 난이도
Angular는 완전한 솔루션이라고 생각해 높은 학습 난이도를 가지고 있으며, 이를 마스터하려면 타입스크립트 및 MVC와 같은 관련 개념을 배워야만 합니다. Angular를 배우는 데는 시간이 걸리지만 이같은 시간 투자는 프론트엔드 전체의 동작방식을 이해하는 측면에서 개발자에게 도움이 되기도 합니다.
React는 약 1시간만에 사용환경을 설정할 수 있는 Getting Started 가이드를 제공합니다. 문서는 철저하고 완벽하며, 일반적인 문제에 대한 해답은 StackOverflow에 등록되어 있습니다. React는 완전한 프레임워크가 아니기 때문에 고급기능을 위해서는 서드파티 라이브러리를 사용해야 합니다. 이로 인해 핵심 프레임워크의 학습난이도가 높지는 않지만 추가기능으로 수행하는 경로에 따라 달라집니다. 또한 서드파티 라이브러리를 사용하는 것이 반드시 모범사례인 것만은 아닙니다.
Vue.js는 Angular나 React보다 배우기가 더 쉽습니다. 또한 Vue.js는 컴포넌트 사용과 같은 기능에 대해 Angular 및 React와 많은 부분이 겹칩니다. 따라서 두 가지 중 하나에서 Vue.js로의 전환은 비교적 용이한 편입니다. 그러나 Vue.js의 단순성과 유연성은 양날의 검입니다. 디버깅 및 테스트가 어려워질 수도 있기 때문입니다.
Angular, React 및 Vue.js는 비교적 서로 다른 학습난이도를 가지고 있지만 학습범위는 매우 넓습니다. 예를 들어, Angular와 React를 WordPress 및 WooCommerce와 통합하여 점진적인 웹 앱을 만들 수 있습니다.
과거 1년 동안 React와 Vue.js, Angular의 NPM(Node Package Manager) 다운로드 현황으로 추측해 보건대, 당분간은 React가 계속해서 대세로 자리잡을 것으로 보입니다.