반응형
반응형

[javascript] 자바스크립트를 사용하여 현재 페이지를 새로고침, 갱신하지 않으면서 다른 주소로 변경하는 방법


History: pushState()

https://developer.mozilla.org/en-US/docs/Web/API/History/pushState


History: pushState() method - Web APIs | MDN

In an HTML document, the history.pushState() method adds an entry to the browser's session history stack.

developer.mozilla.org

history.pushstate(state, title, url)

state = 상태 값을 나타내는 것으로 브라우저에서 앞/ 뒤로 갈 때, 넘겨줄 데이터

title = 변경할 브라우저 제목 (변경을 원하지 않으면 null

url = 변경할 브라우저 URL


const state = { page_id: 1, user_id: 5 };
const url = "hello-world.html";

history.pushState(state, "", url);


const url = new URL(location);
url.searchParams.set("foo", "bar");
history.pushState({}, "", url);

검색 페이지나 페이지네이션(pagination)을 가진 페이지에서 많이 사용됩니다. 즉 검색 조건이나 페이지 전환이 비동기식 ajax로 이루어질때 이를 반영하기 위해 페이지 주소를 함께 변경하는 것입니다. 페이지 주소를 변경해두면 만약 페이지를 리로드, 갱신하더라도 바뀐 주소나 쿼리 스트링 정보를 그대로 가져올 수 있기 때문이죠.

pushstate()의 장점은 페이지 주소만 변경하는 것이 아니라 url 주소를 바꾸면서 동시에 데이터(state)를 전달하거나 타이틀 변경도 가능하다는 점입니다.

  • 데이터 state 값 전달 가능
  • 페이지 타이틀 변경


window.onpopstate = function(event) {
    alert("location: " + document.location + ", state: " + JSON.stringify(event.state));
}

브라우저에서 뒤/앞으로 가는 버튼 클릭 시 onpopstate 이벤트가 발생하며 이때, 콜백함수에서 event.state는 pushState 함수의 인자 값이였던 state 객체가 넘어온 것이다.


onhashchange를 이용할 수도 있다. 

반응형
반응형

1. $(document).ready()

- 외부 리소스. 이미지와는 상관 없이 브라우저가 DOM (document object model) 트리를 생성한 직후 실행
- window.load() 보다 더 빠르게 실행되고 중복 사용하여 실행해도 선언한 순서대로 실행됨
  

2. $(window).load()

- DOM의 standard 이벤트
- html의 로딩이 끝난 후에 시작
- 화면에 필요한 모든 요소(css, js, image, iframe etc..)들이 웹 브라우저 메모리에 모두 올려진 다음에 실행됨
- 화면이 모두 그려진 다음의 메세징이나 이미지가 관련 요소가 모두 올려진 다음의 애니메이션에 적합함
- 전체 페이지의 모든 외부 리소스와 이미지가 브러우저에 불려운 이후 작동하게 되어 이미지가 안뜨너가 딜레이가 생길 때에는 그만큼의 시간을 기다려야 함
- 외부 링크나 파일 인크루트시 그 안에 window.load 스크립트가 있으면 둘 중 하나만 적용됨
- body onload 이벤트와 같이 body에서 onload 이벤트를 쓰게 되면 모든 window.load() 가 실행되지 않는 현상이 발생함
 

* window > document
- document는 window의 자식 객체
  (window의 자식 객체 : document, self, navigator, screen, forms, history, location etc..)
- document : html의 요소들이나 속성들에 접근할 시 사용하는 객체


<!DOCTYPE html>
<html>
<head>
<meta charset="UTF-8">
<title>Insert title here</title>
 
<script src="https://ajax.googleapis.com/ajax/libs/jquery/1.12.4/jquery.min.js"></script>
<script>
$(window).load(function() {
    console.log("console> window.onloade() 첫번째");
});
 
$(window).load(function() {
    console.log("console> window.onload() 두번째");
});
 
$(document).ready(function() {
    console.log("console> document.ready() 첫번째");
});
 
$(document).ready(function() {
    console.log("console> document.ready() 두번째");
});
</script>
 
</head>
<body>
 
</body>
</html>
반응형
반응형

Windows 로그인 화면에서 시스템 종료 버튼을 제거하는 방법

http://choesin.com/windows-%EB%A1%9C%EA%B7%B8%EC%9D%B8-%ED%99%94%EB%A9%B4%EC%97%90%EC%84%9C-%EC%8B%9C%EC%8A%A4%ED%85%9C-%EC%A2%85%EB%A3%8C-%EB%B2%84%ED%8A%BC%EC%9D%84-%EC%A0%9C%EA%B1%B0%ED%95%98%EB%8A%94-%EB%B0%A9


Windows 로그인 화면에서 시스템 종료 버튼을 제거하는 방법 - 최신

기본적으로 Windows에는 로그인 화면에 종료 옵션이있는 버튼이 있습니다. 편리 할 수는 있지만 원하지 않는 경우 쉽게 제거 할 수 있습니다. Windows 로그인 화면에서 종료 버튼을 숨기려는 이유는

choesin.com

반응형
반응형

https://support.apple.com/ko-kr/HT201468


Boot Camp 지원을 사용하여 Mac에 Windows 10 설치하기

Boot Camp를 사용하여 Mac에 Microsoft Windows 10을 설치한 후 Mac을 재시동할 때 macOS와 Windows 간에 전환할 수 있습니다.

support.apple.com

window10 ios download : https://www.microsoft.com/ko-kr/software-download/windows10ISO

Mac에 Windows 10을 설치할 때 필요한 사항

다음 Mac 모델 중 하나를 사용해야 합니다.

  • iMac (2012) 및 이후 모델1
  • iMac Pro(모든 모델)
  • Mac Pro (2013) 및 이후 모델
     

Boot Camp 지원 업데이트가 포함된 최신 macOS 업데이트가 필요합니다. Boot Camp 지원을 사용하여 Windows 10을 설치할 것입니다.

Mac 시동 디스크에 여유 저장 공간이 64GB 이상 있어야 합니다.

  • Mac에 여유 저장 공간이 64GB만 있어도 되지만 128GB 이상일 때 최상의 환경을 제공합니다. Windows 자동 업데이트에는 이와 동일하거나 이보다 많은 공간이 필요합니다.
  • iMac Pro 또는 Mac Pro에 128GB 이상의 메모리(RAM)가 있는 경우 시동 디스크에는 Mac에 있는 메모리 이상의 여유 저장 공간이 필요합니다.2

저장 용량이 16GB 이상인 외장 USB 플래시 드라이브가 필요합니다. 플래시 드라이브가 없어도 Windows를 설치할 수 있는 Mac을 사용 중인 경우는 예외입니다.

ISO(디스크 이미지)나 기타 설치 미디어에 저장된 Windows 10 Home 또는 Windows 10 Pro 64비트 버전이 필요합니다. Mac에 Windows를 처음 설치할 경우 업그레이드 버전이 아닌 Windows 정식 버전을 사용해야 합니다.


Mac에 Windows 10을 설치하는 방법

Windows를 설치하려면 Mac에 포함되어 있는 Boot Camp 지원을 사용합니다.

1. Boot Camp 지원을 사용하여 Windows 파티션 생성하기

응용 프로그램 폴더의 유틸리티 폴더에 있는 'Boot Camp 지원'을 엽니다. 그런 다음 화면의 지침을 따릅니다.

  • USB 드라이브를 삽입하라는 메시지가 표시되면 Mac에 USB 플래시 드라이브를 꽂습니다. Boot Camp 지원이 USB 플래시 드라이브를 사용하여 Windows 설치에 필요한 부팅 가능한 USB 드라이브를 생성합니다.
  • Boot Camp 지원에 Windows 파티션 크기를 설정하라는 메시지가 표시되면 이전 섹션에 나와 있는 최소 저장 공간 요구 사항을 참조합니다. 파티션 크기는 나중에 다시 변경할 수 없으므로 필요한 만큼 충분한 크기의 파티션을 설정합니다.

2. Windows(BOOTCAMP) 파티션 포맷하기

Boot Camp 지원이 작업을 마치면 Mac이 Windows 설치 프로그램으로 재시동됩니다. 설치 프로그램에 Windows 설치 위치를 지정하라는 메시지가 표시되면 BOOTCAMP 파티션을 선택하고 '포맷'을 클릭합니다. 대부분의 경우 설치 프로그램이 자동으로 BOOTCAMP 파티션을 선택하고 포맷합니다.

3. Windows 설치하기

설치 중에 필요하지 않은 외장 기기를 분리합니다. '다음'을 클릭한 후 화면의 지침을 따라 Windows 설치를 시작합니다.

4. Windows에서 Boot Camp 설치 프로그램 사용하기

Windows 설치가 완료되면 Mac이 Windows로 시동되고 'Boot Camp 설치 프로그램 사용을 환영합니다'라고 표시된 윈도우가 열립니다. 화면의 지침에 따라 Boot Camp와 Windows 지원 소프트웨어(드라이버)를 설치합니다. 완료되면 재시동하라는 메시지가 표시됩니다.

  • Boot Camp 설치 프로그램이 자동으로 열리지 않는 경우 직접 Boot Camp 설치 프로그램을 열고 이를 사용하여 Boot Camp 설치를 완료합니다.
  • Mac의 Thunderbolt 3 포트에 외장 디스플레이가 연결된 경우 설치 중에 최대 2분 동안 디스플레이가 검은색, 회색 또는 파란색의 빈 화면으로 표시됩니다.


Windows와 macOS 간에 전환하는 방법

재시동한 다음 시동 중에 option(또는 Alt) ⌥ 키를 길게 눌러 Windows와 macOS 간에 전환합니다.


반응형
반응형

[Window] command 창 프로그램 - ConEmu


http://conemu.github.io/


About ConEmu 

ConEmu-Maximus5 is a Windows console emulator with tabs, which presents multiple consoles and simple GUI applications as one customizable GUI window with various features.

Initially, the program was created as a companion to Far Manager (FAR in Wikipedia), my favorite shell replacement - file and archive management, command history and completion, powerful editor.

Today, ConEmu can be used with any other console application or simple GUI tools (like PuTTY for example). ConEmu is an active project, open to suggestions.

Download ConEmu

Take a look at screencasts about ConEmu.
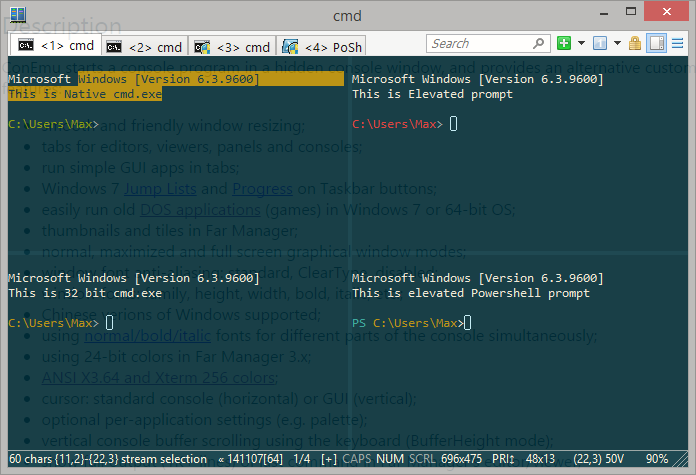
ConEmu screenshot

Votes and awards (vote for ConEmu, if you please).

Disclaimer 

ConEmu is not a shell, so it does not provide "shell features" like remote access, tab-completion, command history and others. ConEmu is advanced console window where you can run any shell of your choice. However, some of these features placed in RoadMap. Also you may try Clink for bash-style completion in cmd.exe and PSReadLine or PowerTab in powershell.exe.

Or even choose bash or any other unix-like shell from cygwinmsysgitmsys2mingw and others.

History 

This project grew up from ConEmu by Zoin.

Description 

ConEmu starts a console program in a hidden console window, and provides an alternative customizable GUI window with various features:

  • smooth and friendly window resizing;
  • tabs for editors, viewers, panels and consoles;
  • run simple GUI apps like PuTTY in tabs;
  • Windows 7 Jump Lists and Progress on Taskbar buttons;
  • easily run old DOS applications (games) in Windows 7 or 64-bit OS;
  • thumbnails and tiles in Far Manager;
  • normal, maximized and full screen graphical window modes;
  • window font anti-aliasing: standard, ClearType, disabled;
  • window fonts: family, height, width, bold, italic, etc.;
  • Chinese versions of Windows supported;
  • using normal/bold/italic fonts for different parts of the console simultaneously;
  • using 24-bit colors in Far Manager 3.x;
  • ANSI X3.64 and Xterm 256 colors;
  • cursor: standard console (horizontal) or GUI (vertical);
  • optional per-application settings (e.g. palette);
  • vertical console buffer scrolling using the keyboard (BufferHeight mode);
  • show full output (1K+ lines) of last command in Far Manager's editor/viewer;
  • customizable Far Manager right click behaviour (long click opens context menu);
  • drag and drop (explorer style) of files and folders in Far Manager;
  • limited support of BDF fonts;
  • user friendly text and block selection;
  • transparency and desktop mode;
  • customizable starting tabs;
  • configurable and clickable status bar;
  • and more, and more... take a look at DocumentationSettings pages and What's New.

All settings are read from the registry or ConEmu.xml file (multiple named configurations are supported), after which the command line parameters are applied. Parameters /Config and /BufferHeight can only be specified on the command line. Most settings are configured using the Settings dialog, not from the command line.

Requirements 

  • Windows 2000 or later.

Installation 

In general, ConEmu installation is easy. Just unpack or install to any folder and run `ConEmu.exe`.

For more information about installation options refer to Installation page.

반응형
반응형


Link : https://code.google.com/p/conemu-maximus5/


단축키 :

  • Ctrl + Shift + E : 가로 새창 열기 
  • Ctrl + Shift + O : 세로 새창 열기

About ConEmu

ConEmu-Maximus5 is a Windows console emulator with tabs, which presents multiple consoles and simple GUI applications as one customizable GUI window with various features.

Initially, the program was created as a companion to Far Manager(FAR in Wikipedia), my favorite shell replacement - file and archive management, command history and completion, powerful editor.

Today, ConEmu can be used with any other console application or simple GUI tools (like PuTTY for example). ConEmu is an active project, open to suggestions.


ConEmu road map

Any help will be very much appreciated!


Download
Latest version, Stable version

This project grew up from ConEmu by Zoin.

Please, vote for Far Manager on forum.ru-board.com :)

Disclaimer #1

ConEmu is not a shell, so it does not provide "shell features" like tab-completion, command history and others. ConEmu is advanced console window where you can run any shell of your choice. However, some of these features placed in RoadMap. Also you may try Clink for bash-style completion.

Disclaimer #2

If you notice lags while executing batches or commands (from cmd/git/bash/etc.) just upgrade to latest alpha build or uncheck option "Inject ConEmuHk". Read Issue 526 for details.

Donation

Documentation, What's new, FAQ, Screenshots, Reviews

Description

ConEmu starts a console program in a hidden console window, and provides an alternative customizable GUI window with various features:

  • smooth and friendly window resizing;
  • tabs for editors, viewers, panels and consoles;
  • run simple GUI apps in tabs;
  • Windows 7 Jump Lists and Progress on Taskbar buttons;
  • easily run old DOS applications (games) in Windows 7 or 64-bit OS;
  • thumbnails and tiles in Far Manager;
  • normal, maximized and full screen graphical window modes;
  • window font anti-aliasing: standard, ClearType, disabled;
  • window fonts: family, height, width, bold, italic, etc.;
  • using normal/bold/italic fonts for different parts of the console simultaneously;
  • Chinese verions of Windows supported;
  • using 24-bit colors in Far Manager 3.x;
  • ANSI X3.64 and Xterm 256 colors;
  • cursor: standard console (horizontal) or GUI (vertical);
  • optional per-application settings (e.g. palette);
  • vertical console buffer scrolling using the keyboard (BufferHeight mode);
  • show full output (1K+ lines) of last command in Far Manager's editor/viewer;
  • customizable Far Manager right click behaviour (long click opens context menu);
  • drag and drop (explorer style) of files and folders in Far Manager;
  • limited support of BDF fonts;
  • user friendly text and block selection;
  • transparency and desktop mode;
  • customizable starting tabs;
  • configurable and clickable status bar;
  • and more, and more... take a look at the Settings dialog, What's New page and Settings.reg

All settings are read from the registry or ConEmu.xml file (multiple named configurations are supported), after which the command line parameters are applied. Parameters /Config and /BufferHeight can only be specified on the command line. Most settings are configured using the Settings dialog, not from the command line.

Requirements

  • Windows 2000 or later.

Installation

  1. Unpack all files (from appropriate "ConEmuPack.*.7z" archive) to the folder, containing "far.exe", or install the "ConEmuSetup.*.exe" package.
    • If You are using Far Manager, please ensure that ConEmu plugins ("Plugins\ConEmu\ConEmu.dll" etc.) are installed to Far Manager's Plugins folder.
    • If You are not using Far Manager, You may unpack the files to any folder, and delete the "Plugins" subfolder.
    • Warning: because of frequent non-backwards-compatible API changes in Far 3, it is strongly recommended to use the latest developer build when using ConEmu with Far 3.
  2. Import ConEmu's macros into Far Manager. Macro files are located in the ConEmu.Addons directory. Each macro file has a description in its header.
  3. By default (when started without command-line parameters), ConEmu runs "far.exe" from its home folder, or "cmd.exe"/"tcc.exe" if Far Manager was not found. Alternatively, You may indicate any root command by specifying a "/Cmd <App with params>" argument in ConEmu's shortcut or command line.

Screenshots


More screenshots

반응형

+ Recent posts