
Google Colaboratory - python 실습하기
https://colab.research.google.com/
Google Colaboratory
colab.research.google.com
https://research.google.com/colaboratory/faq.html
Google Colab
Colaboratory 자주 묻는 질문(FAQ) 기본 사항 Colaboratory란 무엇인가요? 줄여서 'Colab'이라고도 하는 Colaboratory는 Google 리서치팀에서 개발한 제품입니다. Colab을 사용하면 누구나 브라우저를 통해 임의의
research.google.com
자주 묻는 질문(FAQ)
기본 사항
줄여서 'Colab'이라고도 하는 Colaboratory는 Google 리서치팀에서 개발한 제품입니다. Colab을 사용하면 누구나 브라우저를 통해 임의의 Python 코드를 작성하고 실행할 수 있습니다. Colab은 특히 머신러닝, 데이터 분석, 교육에 적합합니다. 더 기술적으로 설명하면 Colab은 호스팅된 Jupyter 노트북 서비스로, 설정하지 않고 사용 가능하며 GPU를 포함한 컴퓨팅 리소스를 무료로 사용할 수 있습니다.
예. Colab은 무료로 사용할 수 있습니다.
Colab 리소스는 보장되거나 무제한으로 제공되지는 않으며 사용량 한도가 달라지기도 합니다. 이런 방식으로 운영해야 Colab에서 리소스를 무료로 제공할 수 있기 때문입니다. 자세한 내용은 리소스 한도를 참고하세요.
향상된 리소스를 더 안정적으로 사용하는 데 관심이 있다면 Colab Pro가 적합할 수 있습니다.
Colab 리소스는 상호작용 사용 사례에 우선 할당됩니다. 일괄 연산, 다른 사용자에게 부정적인 영향을 줄 수 있는 작업, 정책을 우회하는 작업 등은 금지됩니다. 다음은 Colab 런타임에서 허용되지 않는 사항입니다.
- Colab과의 상호작용 연산과 관련이 없는 파일 호스팅, 미디어 게재 또는 기타 웹 서비스 제공
- 토렌트 다운로드 또는 P2P 파일 공유 참여
- 원격 데스크톱 또는 SSH 사용
- 원격 프록시 연결
- 암호화폐 채굴
- 서비스 거부 공격 실행
- 비밀번호 크래킹
- 여러 계정을 사용하여 액세스 제한이나 리소스 사용 제한 우회
- 딥페이크 생성
유료 사용자를 위한 추가 제한사항은 여기에서 확인하시기 바랍니다.
Jupyter는 Colab의 기반이 되어 주는 오픈소스 프로젝트입니다. Colab을 사용하면 아무것도 다운로드하거나 설치, 실행하지 않고도 Jupyter 메모장을 다른 사람과 공유할 수 있습니다.
Colab 사용하기
Google Colab Free GPU Tutorial
https://medium.com/deep-learning-turkey/google-colab-free-gpu-tutorial-e113627b9f5d
Google Colab Free GPU Tutorial
Now you can develop deep learning applications with Google Colaboratory -on the free Tesla K80 GPU- using Keras, Tensorflow and PyTorch.
medium.com
Hello! I will show you how to use Google Colab, Google’s free cloud service for AI developers. With Colab, you can develop deep learning applications on the GPU for free.
Thanks to KDnuggets!
I am happy to announce that this blog post was selected as KDnuggets Silver Blog for February 2018! Read this on KDnuggets.

What is Google Colab?
Google Colab is a free cloud service and now it supports free GPU!
You can;
- improve your Python programming language coding skills.
- develop deep learning applications using popular libraries such as Keras, TensorFlow, PyTorch, and OpenCV.
The most important feature that distinguishes Colab from other free cloud services is; Colab provides GPU and is totally free.
Detailed information about the service can be found on the faq page.
Getting Google Colab Ready to Use
Creating Folder on Google Drive

Since Colab is working on your own Google Drive, we first need to specify the folder we’ll work. I created a folder named “app” on my Google Drive. Of course, you can use a different name or choose the default Colab Notebooks folder instead of app folder.

I created an empty “app” folder
Creating New Colab Notebook
Create a new notebook via Right click > More > Colaboratory

Right click > More > Colaboratory
Rename notebook by means of clicking the file name.

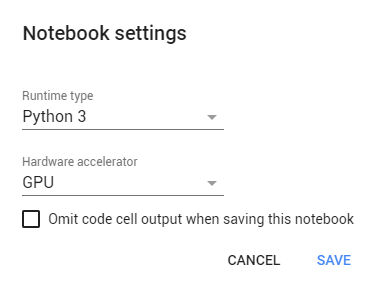
Setting Free GPU
It is so simple to alter default hardware (CPU to GPU or vice versa); just follow Edit > Notebook settings or Runtime>Change runtime type and select GPU as Hardware accelerator.
Running Basic Python Codes with Google Colab
Now we can start using Google Colab.

I will run some Basic Data Types codes from Python Numpy Tutorial.

It works as expected :) If you do not know Python which is the most popular programming language for AI, I would recommend this simple and clean tutorial.
Running or Importing .py Files with Google Colab
Run these codes first in order to install the necessary libraries and perform authorization.
When you run the code above, you should see a result like this:

Click the link, copy verification code and paste it to text box.
After completion of the authorization process, you should see this:

Now you can reach you Google Drive with:
install Keras:
!pip install -q kerasupload mnist_cnn.py file to app folder which is located on your Google Drive.

mnist_cnn.py file
run the code below to train a simple convnet on the MNIST dataset.
!python3 "/content/drive/My Drive/app/mnist_cnn.py"
As you can see from the results, each epoch lasts only 11 seconds.
'프로그래밍 > Python' 카테고리의 다른 글
| [python] 패키지 목록 관리하기 (1) | 2022.11.14 |
|---|---|
| [python] Python 3 Cheat Sheet (0) | 2022.11.08 |
| [Python] 파이썬의 역사 (0) | 2022.10.21 |
| [python] 어린이를 위한 파이썬 교육용 서버리스 주피터 노트북 앱 만들기, 신정규 - PyCon Korea 2022 (0) | 2022.10.13 |
| [Python] PyCon.KR 2022 유튜브 영상 (0) | 2022.10.13 |