반응형
반응형

[apple] ‘아이폰X’ 공개


https://www.apple.com/iphone-x/


아이폰이 나온 지 10년이 지난 지금, 새로운 아이폰이 공개됐다. 제품의 이름은 ‘아이폰X’다.


애플은 9월12일(현지시간) 미국 캘리포니아주 쿠퍼티노 애플 신사옥 애플파크에 있는 스티브 잡스 극장에서 ‘아이폰X’를 공개했다. 애초 새롭게 발표될 제품으로 ‘아이폰7S’, ‘아이폰7S 플러스’, ‘아이폰8’ 등의 이름이 거론됐지만 행사 직전 나온 유출 정보대로 각각 ‘아이폰8’, ‘아이폰8 플러스’, ‘아이폰X’라는 이름으로 공식 발표됐다.


홈버튼의 자리는 없었다. 제품 전면부가 화면으로 가득 찬 만큼 제품 후면으로 이동하거나 화면에 내장될 것으로 예상되기도 했지만, 홈버튼은 결국 ‘밀어서 잠금해제’처럼 역사 속으로 사라졌다. 지문인식 기능인 ‘터치아이디’ 역시 함께 실종됐다. 대신에 새롭게 추가된 기능들이 사라진 것들의 자리를 메웠다. 홈버튼은 제스처로, 터치아이디는 ‘페이스아이디’로 대체됐다.


아이폰X 발표의 많은 시간은 홈버튼의 역할을 대신하는 스와이프 동작을 시연하는 데 할애됐다. 홈버튼은 상징적인 존재이기도 하지만 아이폰의 사용자 경험에서 차지하는 비중이 높다. 기존 홈버튼 기능들은 화면 하단의 바를 손가락으로 밀어올리는 방식으로 작동한다. 일명 ‘스와이프업’ 방식으로 홈화면으로 돌아가거나 앱을 끄고 정리할 수 있다.


터치아이디의 역할은 얼굴인식 기능인 페이스아이디가 대신한다. 사용자의 얼굴을 암호화해 잠금을 해제하는 방식이다. 페이스아이디는 전면 카메라인 ‘트루뎁스 카메라’에 적용된 기술로 구현된다. 보이지 않는 3만개 이상의 도트를 얼굴에 투사해 사용자의 얼굴 맵을 만든다. 적외선 카메라가 얼굴의 도트 패턴을 판독하고 데이터 일치 여부를 확인해 사용자를 인증한다.


페이스아이디는 본인이 직접 바라보는 경우에만 잠금이 해제된다. 사진이나 가면을 이용한 스푸핑을 통해 보안이 뚫리지 않으며 적외선 센서를 통해 어두운 곳에서도 작동한다. 또 새로운 칩셋인 ‘A11 바이오닉’은 머신러닝을 통해 외모 변화를 인지한다. 안경과 모자를 써도, 수염을 기르고 머리 모양을 바꿔도 사용자를 알아본다. 자는 동안 얼굴을 인증하면 보안이 쉽게 뚫리지 않을까 하는 우려가 있지만, 페이스아이디는 눈을 똑바로 뜨고 기기를 응시할 때만 잠금을 해제한다.


애플은 물리적 기능을 덜어내고 새로운 사용자 경험을 더해 미래의 스마트폰을 제시하고자 한다. ‘기기의 물리적 실체는 사라지고 경험만 남는 몰입감’을 주려 하는 셈이다. 지난 10년간 아이폰의 정체성을 구성하던 홈버튼이 과감히 제거된 이유다.


기존의 듀얼 카메라는 더욱 강화됐다. 1200만화소의 광각 및 망원 카메라가 들어가며 ‘갤럭시노트8’처럼 듀얼 손떨림 방지 기능 OIS가 적용됐다. 듀얼카메라를 통해 DSLR 같은 아웃포커싱을 구현하는 인물사진 모드도 향상됐다. 얼굴의 밝기를 별도로 조절할 수 있는 인물사진 조명 모드가 추가됐다. 인물사진 모드는 전면 카메라를 통해서도 구현된다.


‘A11 바이오닉’ 칩 덕분에 성능은 더욱 향상됐으며 배터리는 아이폰7보다 최대 2시간 더 오래간다. 제품 후면이 유리 재질로 돼 있어 무선충전 기능(Qi 방식)도 어렵지 않게 구현됐다. ‘아이패드 프로’에 적용된 ‘트루톤 디스플레이’도 탑재됐다. 트루톤 디스플레이는 주변 조명 환경에 맞춰 자동으로 화면 색온도를 조절해주는 기능이다.


기존 이모지에 얼굴인식 기능을 접목한 ‘애니모지’ 기능은 더욱 풍부한 감정표현을 가능하게 한다. 아이폰X는 스페이스 그레이와 실버 2가지 색상으로 제공된다. 저장용량은 64G와 256GB 중 하나를 선택할 수 있다.


발표에 나선 팀 쿡 애플 CEO는 아이폰X가 스티브 잡스에게도 자랑스러운 제품일 것이라고 말했다. 자신들이 만든 최고의 아이폰이라고 자부했다. 아이폰X는 인류에 감사를 표하는 방법 중 하나가 될까. 아이폰X는 미국 기준으로 11월3일 발매된다. 가격은 999달러다.


Spec : https://www.apple.com/iphone-x/specs/

•칩: A11 Bionic 칩(64비트 아키텍처) / M11 모션 보조 프로세서 내장

•디스플레이: 슈퍼 레티나 HD 디스플레이(5.8형 OLED) / 2436×1125 해상도(458ppi) / HDR / 트루톤 디스플레이 / 와이드 컬러(p3) / 3D 터치

•저장 용량: 64GB, 256GB

•후면 듀얼카메라: 1200만 화소 광각(f1.8) 및 망원 카메라(f2.4) / 듀얼 광학 이미지 흔들림 보정(OIS)

•전면 카메라: 700만 화소, f2.2 / 인물사진 및 인물사진 조명 모드 지원(아웃포커싱)

•배터리: 통화 21시간, 인터넷 12시간, 동영상 13시간, 오디오 60시간 (아이폰7보다 최대 2시간 더 긴 배터리)

•운영체제: iOS11

•크기 및 무게: 143.6 x 70.9 x 7.7mm / 174g

•색상: 스페이스 그레이, 실버

•가격: 999달러

•기타: IP67 등급 방수·방진, 무선 충전(Qi 충전기 연동), 페이스아이디(얼굴인식)

...

반응형
반응형
Every iPhone Speed Test Comparison 2016!


반응형

'프로그래밍 > App' 카테고리의 다른 글

기억해두세요, 최고의 C++ 강의 5개  (0) 2017.01.25
What is GitHub Pages?  (0) 2016.12.29
[Mobile Dev] Redbeard: Boilerplate-free native app development  (0) 2016.08.03
[APP] Parse  (0) 2016.04.07
이유 있는 선택 Go 언어  (0) 2016.03.04
반응형

iOS 7

The mobile OS from a whole new perspective.


http://www.apple.com/ios/ios7/#videos


반응형
반응형

How to build an app: 20 great tutorials

http://www.creativebloq.com/app-design/how-build-app-tutorials-12121473

iOS app tutorials

01. Get started as an iOS developer

Got an idea for a killer app but don’t know where to begin? Daniel Bramhall of Visioa explains everything you need to know to start programming for Apple devices.

02. Design an iPhone app user interface

Designing for iOS devices is totally different from designing for the web. Sarah Parmenter explains how to create the perfect user interface for your app.

03. Create an iPad game

Appcelerator Titanium is a fantastically versatile tool for creating mobile apps, as Anton Mills demonstrates with this game for the iPad.

04. Create an iPhone game

Hello Monday walks you through how to turn a rejected concept into a GPS-based arcade game.

05. How to distribute your app

Creating an application can be extremely exciting for any developer but before you get your application published, you need to get it ready. iOS and Mac developer/designer Daniel Bramhall explains how.

06. Get started with geofencing

Explore the location-based services provided by the iOS Core Location framework in Kevin McMahon's guide to building and testing a geofencing-enabled application.

07. Build an iPad app with Sencha Touch

Create a web app that feels native on the iPad and other mobile devices, using the Sencha Touch library. Robert Douglas of mobile design specialists ribot explains how.

Android app tutorials

08. Getting To Know The Android Platform

This article explains what you need to do to build a scalable app that looks and feels right at home on Android, how to test it and your options for distributing it. After reading this article, you should have a good understanding of what kinds of decisions and challenges you will face when creating an Android app.

09. Build your first Android app

This tutorial gets you started with Android development without requiring you to wade through pages of technical documentation. At the end, you'll have written a simple Android app and you will be able to deploy the application onto an emulator or a real Android device.

10. Design an Android app user interface

Android apps can be just as beautiful as their iOS counterparts. Richard Leggett, co-director of Bitmode Ltd, digs deep into the styling and theming and explains how to use just XML and image files to add a fresh look and feel to your app.

11. Automate your app testing

Don’t trust humans to do all of your testing - not even experts. John Senner, Koa Metter, and Emory Myers of MokaSocial reveal how to delegate the dirty work.

12. Make your Android app's voice output accessible

Integrating core accessibility into Android app development is relatively straightforward to do and should be considered as business as usual for every project. Here's how to do it.

Facebook app tutorials

13. Get started with Facebook’s app tools

Techlightenment's systems architect Chas Coppard gives us a rundown of the APIs and plug-ins available to connect your site to Facebook.

14. Build a Facebook app

Facebook recently unveiled the Open Graph as its next generation platform. Mat Clayton shows you how to build a simple demo app on the Open Graph.

App-building frameworks

15. Get started with PhoneGap

In this excerpt from the PhoneGap Beginner's Guide, Nitobi/Adobe's Andrew Lunny goes over the biggest roadblock developers find with the mobile development framework: getting started and building simple apps for iOS, Android, and BlackBerry.

16. Create a theme in jQuery Mobile

We present an exclusive excerpt from jQuery Mobile Web Development Essentials, on the basics of theming and building and using a custom theme for your app.

17. Build a login form with DHTMLX Touch

In this introduction to open source JavaScript framework DHTMLX Touch web developer Alexandra Klenova explains how you can implement a login form for a mobile web app and send form values to the server with Ajax.

18. Code a real-time survey with HTML5 WebSockets

Phil Leggetter explains how to use WebSockets and Pusher to build a demo application, plus how to layer a user experience on to an app using progressive enhancement.

19. Build a game for iOS and Android with Corona

Jonathan Beebe of Ansca, Inc explains how to easily create a fun 2D physics game for iOS and Android mobile platforms using Corona.

20. Style the UI of a Sencha app

In this exclusive excerpt from their book on the Sencha Touch mobile JavaScript framework, John Clark and Bryan Johnson explain how to customise your app and use the Sencha theme engine with SASS and Compass.

And that's it! Have you seen an app tutorial you'd like to recommend? Let us know about it in the comments!

Now read:

반응형
반응형

  IOS6 업데이트 이후 세션 문제


- IOS 6.0 사파리 브라우져의 [쿠키허용] 정책 변경

- 기존 설정 (쿠키 허용에 대한 정책 설정)으로는 결제시 안심클릭 카드사 인증에 대한 세션을 유지하지 못하게 되면

결제 진행 불가 (카드사 인증창 호출 불가)현상 발생 할 수 있음


1. 기존(IOS 6.0이전) 쿠키 허용 기본 값 : “방문한 곳” or “항상” 설정시 결제이용 가능 (세션유지가 가능)

2. 변경(IOS 6.0 이후) : “항상” 설정 시에만 세션유지 가능. “방문한곳”, “안함” 일 경우 세션 단절


반응형
반응형

Simple Tips for Designing Better iPhone Apps

Sep 4 2012 by Nathan Barry | 1 Comment | Stumble Bookmark

5 Simple Tips for Designing Better iPhone Apps

As users shop the Apple App Store looking for new apps to buy, they judge their potential purchases based on design.

We’re told early on in life not to judge a book by its cover, but without a way to trial an app, screenshots are one of the few ways a user can judge the quality of it.

Since it’s not possible for someone to judge ease-of-use (usability) or code-quality just by browsing the App Store, judging entirely based on design makes sense, and so apps with better design tend to be chosen more often when compared with competing apps.

So how can we design better apps? Well, I’m glad you asked. I’ll discuss five simple tips that will help.

1. Wireframe Your App

When we talk about an app’s design, we’re talking about two main components. These two components are user experience (UX) design and user interface (UI) design.

Experience design is all about the goals of the app, such as which features to include, and how the user will accomplish those goals.

The user interface design is what that experience looks like visually. That includes the colors, textures, and fonts used to craft the visual style of the app.

In designing iPhone apps, both of those design components are critical and go hand in hand.

However, it’s important that you first spend time on designing the experience of the user. Instead of starting with the visual design of your iPhone app, start with wireframes.

A wireframe is a simple outline of your app idea that allows you to work exclusively on the experience, ignoring the visual aspects. (Read more benefits of wireframing your designs.)

I like to use pen and paper to draw simple boxes and shapes for my wireframes. Others use everything from Illustrator to Balsamiq Mockups (a popular tool for wireframing apps). For this task, the tool doesn’t matter.

Image source: MOObileFrames

You want to focus on planning out how your app features will fit together, what screen the user will encounter first, and how they’ll navigate your application.

Draw buttons, write in text, and especially focus on making the learning process intuitive.

Only start paying attention to style once you’re confident that your wireframes represent a clean, usable app design.

2. Use Finger-Sized Tap Targets

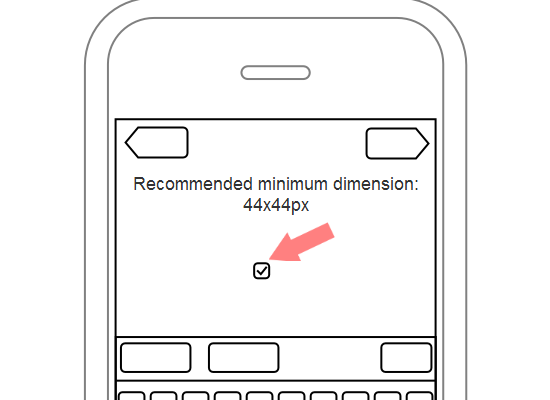
This is the biggest thing you can do to improve the usability of your app: Increase the tappable area for every button. You’re designing for fingers and thumbs, not mouse cursors (which have a higher pointing accuracy).

Apple recommends a minimum of 44x44px for any element the user is expected to interact with.

Now this doesn’t mean that the button needs to visually look that big. The tappable area can extend beyond the visual size of the button. This will help users avoid the frustration of trying multiple times to tap an element. Just be careful if you have several buttons close to each other. Make sure that your extra tappable area doesn’t overlap with other buttons.

3. Have Only One Primary Goal Per Screen

When you’re designing a screen in your app, focus on the primary goal you want the user to accomplish.

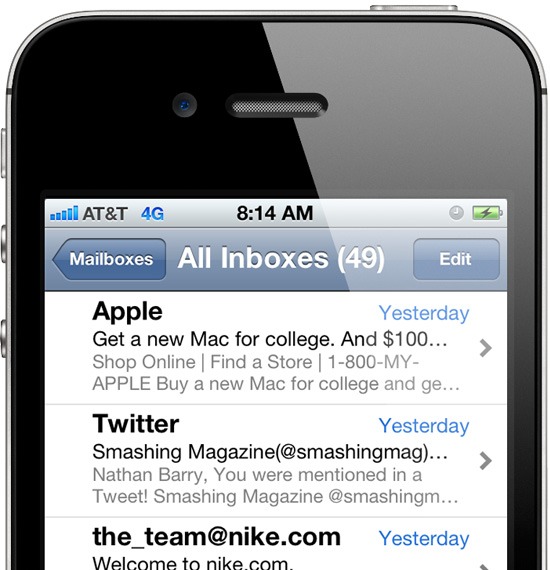
For example, in the email list screen in iPhone’s Mail app, the user’s primary goal is to read emails. Though there’s a secondary action for composing an email, the button is off in the corner and not emphasized.

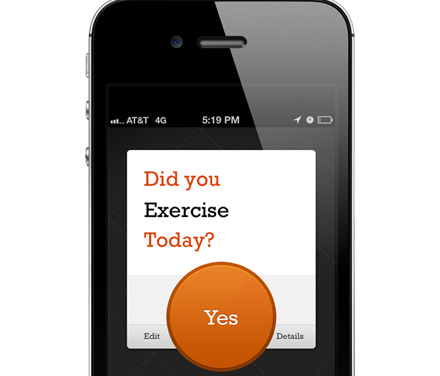
In Commit (one of my iPhone applications) the primary action of the commitment screen is to mark it complete. So I made a huge orange button for that action. Though other buttons are on the same screen, none compete for attention with the primary action.

One of your tasks as a designer is to decide what’s the most important, and then emphasize that. Decrease the visual weight of secondary elements so that the primary action is clear.

To help you create better visual hierarchies and priorities in your designs, check out the following articles:

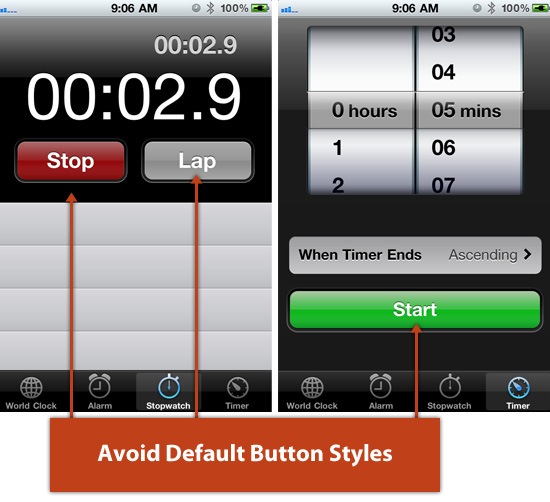
4. Avoid Default Button Styles

The default style for UIButtons on the iPhone is one of my biggest design pet peeves. Almost all of the default elements included with iOS look good. Then there is the default button.

Default Button Styles

Unless you have a very boring design style for your app, chances are, the default button styles won’t match. Customizing the look of buttons to match your UI will make a huge difference and keep you from looking like an amateur app designer.

You can either set the button style to Custom and include a background image, or you can draw a new button style with code.

There are plenty of tutorials and resources that will help you create great looking buttons. Take a look at both of these resources:

5. Add Extra Views When There’s a Lot of Information

 Moving into a new view (either through a push or modal transition) is very easy for the user. So if you find yourself trying to add too much information to a single view, then just add another view.

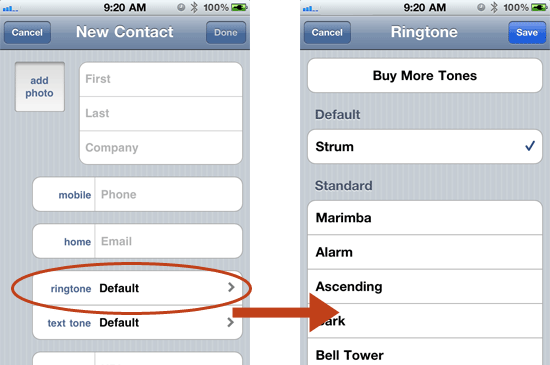
In iPhone, you can see Apple does this quite often on their "create" screens.

In the New Contact view, selecting a ringtone pushes/slides you to a new view called Ringtones that displays the list of available ringtones you can assign to that new contact.

Tapping a phone number label brings up a modal dialog with other label options (called Label).

By adding extra screens, you can avoid confusing your users with too many cluttered elements by only showing the information they request (a concept known as progressive disclosure).

Related Content


반응형

+ Recent posts