반응형
반응형


 ./input/ 폴더 안에 있는 엑셀파일을 찾아서 데이터 있는 셀의 앞뒤 공백을 삭제


# pip install pandas openpyxl


"""
    ./input/ 폴더 안에 있는 엑셀파일을 찾아서 데이터 있는 셀의 앞뒤 공백을 삭제

"""

import pandas as pd
import os

# 엑셀 파일이 있는 폴더 경로
input_folder = "./input/"

# 공백이 제거된 파일을 저장할 폴더 (원본 폴더에 저장)
output_folder = "./output/"

# 출력 폴더가 없으면 생성
if not os.path.isdir(output_folder):
    os.makedirs(output_folder)

# input 폴더 내의 모든 파일 목록 가져오기
files = os.listdir(input_folder)

print(f"'{input_folder}' 폴더에서 엑셀 파일을 찾고 있습니다...")

# 파일 목록을 순회
for filename in files:
    # 파일 확장자가 .xlsx 또는 .xls인지 확인
    if filename.endswith(".xlsx") or filename.endswith(".xls"):
        print(f"\n파일 '{filename}' 처리 중...")
        
        # 전체 파일 경로 설정
        file_path = os.path.join(input_folder, filename)
        
        try:
            # 엑셀 파일을 데이터프레임으로 읽어오기
            # 모든 시트를 읽어오기 위해 sheet_name=None 옵션 사용
            #excel_data = pd.read_excel(file_path, sheet_name=None) # 헤더 제외
            excel_data = pd.read_excel(file_path, sheet_name=None, header=0, dtype=str) # 모든 데이터를 문자열로 읽기
            
            # 수정한 내용을 저장할 새로운 엑셀 파일 객체 생성
            output_filepath = os.path.join(output_folder, f"{os.path.splitext(filename)[0]}_cleaned{os.path.splitext(filename)[1]}")
            
            with pd.ExcelWriter(output_filepath, engine='openpyxl') as writer:
                # 각 시트(Sheet)를 순회하며 작업
                for sheet_name, df in excel_data.items():
                    print(f"  - 시트 '{sheet_name}' 공백 삭제 중...")
                    
                    # 문자열 타입의 열만 선택하여 공백 제거
                    for col in df.columns:
                        if df[col].dtype == 'object':
                            # .str.strip() 메서드로 앞뒤 공백 제거
                            #df[col] = df[col].astype(str).str.strip()                            
                            df[col] = df[col].fillna('').astype(str).str.strip() # NaN 값이 있을 때 오류 방지
                            print(df[col])
                    
                    # 수정된 데이터프레임을 새로운 엑셀 파일의 해당 시트에 저장
                    df.to_excel(writer, sheet_name=sheet_name, index=False)
            
            print(f"'{filename}' 파일 처리가 완료되었습니다. '{output_filepath}'에 저장됨.")

        except Exception as e:
            print(f"  - 오류 발생: '{filename}' 파일을 처리할 수 없습니다. 오류: {e}")

print("\n모든 엑셀 파일 처리가 완료되었습니다.")
반응형
반응형

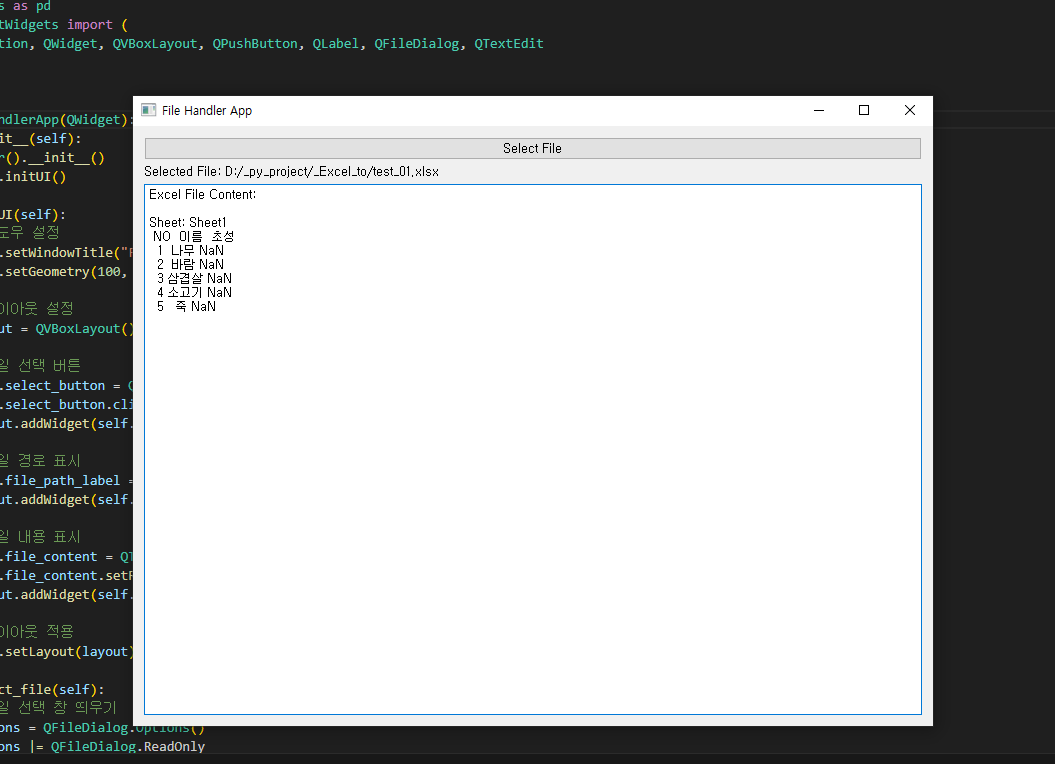
파일 선택 창을 띄워 파일을 선택하고, 선택한 파일을 읽어서 내용을 출력하는 PyQt5 프로그램입니다. 파일 선택 창은 QFileDialog를 사용합니다.

선택한 파일이 엑셀 파일(.xlsx, .xls)인 경우, 엑셀 내용을 시트별로 읽어와 화면에 출력하고, 텍스트 파일인 경우 텍스트 내용을 그대로 보여주는 PyQt5 프로그램입니다.

엑셀 파일 처리를 위해 openpyxl 또는 pandas 라이브러리를 사용할 수 있습니다. 여기서는 pandas를 이용합니다.


import sys
import os
import pandas as pd
from PyQt5.QtWidgets import (
    QApplication, QWidget, QVBoxLayout, QPushButton, QLabel, QFileDialog, QTextEdit
)


class FileHandlerApp(QWidget):
    def __init__(self):
        super().__init__()
        self.initUI()

    def initUI(self):
        # 윈도우 설정
        self.setWindowTitle("File Handler App")
        self.setGeometry(100, 100, 800, 600)

        # 레이아웃 설정
        layout = QVBoxLayout()

        # 파일 선택 버튼
        self.select_button = QPushButton("Select File", self)
        self.select_button.clicked.connect(self.select_file)
        layout.addWidget(self.select_button)

        # 파일 경로 표시
        self.file_path_label = QLabel("No file selected", self)
        layout.addWidget(self.file_path_label)

        # 파일 내용 표시
        self.file_content = QTextEdit(self)
        self.file_content.setReadOnly(True)
        layout.addWidget(self.file_content)

        # 레이아웃 적용
        self.setLayout(layout)

    def select_file(self):
        # 파일 선택 창 띄우기
        options = QFileDialog.Options()
        options |= QFileDialog.ReadOnly
        file_path, _ = QFileDialog.getOpenFileName(
            self, "Select File", "", "All Files (*);;Excel Files (*.xlsx *.xls);;Text Files (*.txt)", options=options
        )

        if file_path:
            # 선택한 파일 경로 표시
            self.file_path_label.setText(f"Selected File: {file_path}")

            # 파일 확장자 확인
            _, file_extension = os.path.splitext(file_path)

            # 파일 처리
            if file_extension in [".xlsx", ".xls"]:
                self.read_excel(file_path)
            elif file_extension == ".txt":
                self.read_text(file_path)
            else:
                self.file_content.setText("Unsupported file type. Please select an Excel or text file.")

    def read_text(self, file_path):
        """텍스트 파일을 읽어와 화면에 표시"""
        try:
            with open(file_path, 'r', encoding='utf-8') as file:
                content = file.read()
                self.file_content.setText(content)
        except Exception as e:
            self.file_content.setText(f"Error reading file: {str(e)}")

    def read_excel(self, file_path):
        """엑셀 파일을 읽어와 화면에 표시"""
        try:
            excel_data = pd.ExcelFile(file_path)  # 엑셀 파일 읽기
            content = "Excel File Content:\n\n"

            # 시트별로 데이터 읽기
            for sheet_name in excel_data.sheet_names:
                content += f"Sheet: {sheet_name}\n"
                sheet_data = excel_data.parse(sheet_name).head(10)  # 각 시트의 첫 10행 읽기
                content += sheet_data.to_string(index=False)
                content += "\n\n"

            self.file_content.setText(content)
        except Exception as e:
            self.file_content.setText(f"Error reading Excel file: {str(e)}")


# 프로그램 실행
if __name__ == "__main__":
    app = QApplication(sys.argv)
    window = FileHandlerApp()
    window.show()
    sys.exit(app.exec_())
반응형
반응형

엑셀에서 첫 셀에 입력한 공식을 아래로 한 번에 복사하여 적용하는 단축키는 다음과 같습니다:

  1. 첫 번째 셀에 수식 입력: 예를 들어, C1 셀에 수식을 입력했다면, 해당 수식을 아래로 복사하고자 합니다.
  2. 해당 셀 선택: 수식이 있는 첫 번째 셀(C1)을 선택합니다.
  3. Ctrl + Shift + ↓ (아래 방향키): 수식을 복사하고자 하는 범위를 선택합니다. 첫 번째 셀에서 **Ctrl + Shift + ↓**를 눌러 마지막 셀까지 범위를 선택합니다.
  4. Ctrl + D: 선택한 범위의 첫 번째 셀의 수식을 아래로 복사하여 적용합니다.

이 방법을 사용하면 첫 번째 셀의 수식을 여러 셀에 한 번에 복사할 수 있습니다.


반응형
반응형

[python] 생성된 엑셀을  Frequency 순으로,  동일 Frequency 이면 단어순으로 정렬

import pandas as pd
from collections import Counter
import re

def read_text_file(file_path):
    """텍스트 파일을 읽고 내용을 반환"""
    with open(file_path, 'r', encoding='utf-8') as file:
        return file.read()

def count_word_frequencies(text):
    """주어진 텍스트에서 단어 빈도수 계산"""
    words = re.findall(r'\b\w+\b', text.lower())
    return Counter(words)

def save_frequencies_to_excel(frequencies, output_file):
    """단어 빈도수를 엑셀 파일로 저장"""
    # 판다스 DataFrame으로 변환
    df = pd.DataFrame(list(frequencies.items()), columns=['Word', 'Frequency'])
    # 빈도수 내림차순, 단어 알파벳순 오름차순으로 정렬
    df = df.sort_values(by=['Frequency', 'Word'], ascending=[False, True])
    # 데이터를 엑셀 파일로 저장
    df.to_excel(output_file, index=False)

# 파일 경로
file_path = 'example.txt'
output_excel = 'word_frequencies.xlsx'

# 파일 읽기
text = read_text_file(file_path)

# 빈도수 분석
frequencies = count_word_frequencies(text)

# 엑셀로 저장
save_frequencies_to_excel(frequencies, output_excel)

print("단어 빈도수가 정렬되어 엑셀 파일로 저장되었습니다.")
  1. DataFrame 변환 및 정렬: pandas.DataFrame을 사용하여 빈도수 데이터를 DataFrame으로 변환한 후, sort_values 메소드를 사용하여 먼저 Frequency 열에 대해 내림차순으로, 동일한 빈도를 가진 항목에 대해서는 Word 열을 기준으로 오름차순 정렬합니다. ascending=[False, True] 파라미터는 각각 Frequency와 Word 열에 적용됩니다.
  2. 엑셀 파일 저장: 정렬된 데이터를 .xlsx 형식의 파일로 저장합니다.
반응형
반응형

[python] 엑셀 읽고 쓰기 


https://pypi.org/project/openpyxl/


openpyxl

A Python library to read/write Excel 2010 xlsx/xlsm files

pypi.org


pip install openpyxl


반응형
반응형

[엑셀] 틀고정 2개 하기. 


[보기] - [틀고정]  

 - 첫 행 고정

 - 첫 열 고정

  : 첫 열이나 첫 행을 고정해서 첫 열이나 행에 내용을 추가해도 된다. 


-  틀고정

  : D,E열과 E열 4번과 5번열을 틀고정으로 구분하고 싶으면 바로 밑인 E열5번 셀을 선택하고 틀고정을 눌러주면 된다.  

반응형

+ Recent posts