
반응형
[pytho] FFmpeg 설치하기
1. Windows에 FFmpeg 설치하기 (권장 방법)
Windows에서는 패키지 관리자를 사용하거나, 수동으로 바이너리 파일을 다운로드하여 설치할 수 있습니다. 수동 설치 후 **환경 변수(PATH)**를 설정하는 것이 중요합니다.
1-1. 수동 설치 (일반적이고 권장되는 방법)
- FFmpeg 다운로드:
- FFmpeg 공식 다운로드 페이지로 이동합니다.
- "Windows builds" 섹션 아래에서 권장되는 빌드 중 하나를 선택합니다. (예: gyan.dev 또는 BtbN)
- gyan.dev로 접속했다면, "release builds" 섹션에서 ffmpeg-release-full.7z (전체 기능 포함) 또는 ffmpeg-release-essentials.7z (필수 기능만 포함) 중 하나를 다운로드합니다. 보통 full 버전을 권장합니다.
- 압축 해제: 다운로드한 .7z 파일의 압축을 해제합니다. (7-Zip 같은 압축 해제 프로그램이 필요할 수 있습니다.) 압축을 해제한 폴더를 C:\ 또는 D:\와 같이 이동하거나 삭제하지 않을 안정적인 위치에 놓습니다. (예: C:\ffmpeg)
- 환경 변수(PATH) 설정: FFmpeg 실행 파일이 있는 bin 폴더의 경로를 시스템 PATH 환경 변수에 추가해야 합니다. 그래야 명령 프롬프트의 어느 위치에서든 ffmpeg 명령어를 사용할 수 있습니다.
- "시작" 메뉴 검색창에 "환경 변수"를 입력하고 **"시스템 환경 변수 편집"**을 엽니다.
- "고급" 탭에서 "환경 변수(N)..." 버튼을 클릭합니다.
- "사용자 변수" 또는 "시스템 변수" 섹션에서 Path를 찾아 선택하고 "편집(I)..." 버튼을 클릭합니다.
- **"새로 만들기(N)"**를 클릭하고, 압축을 해제한 FFmpeg 폴더 안의 bin 폴더 경로를 붙여넣습니다. (예: C:\ffmpeg\bin 또는 C:\Users\사용자명\Downloads\ffmpeg-xxxxx-full_build\bin)
- 모든 창에서 **"확인"**을 클릭하여 변경 사항을 저장합니다.
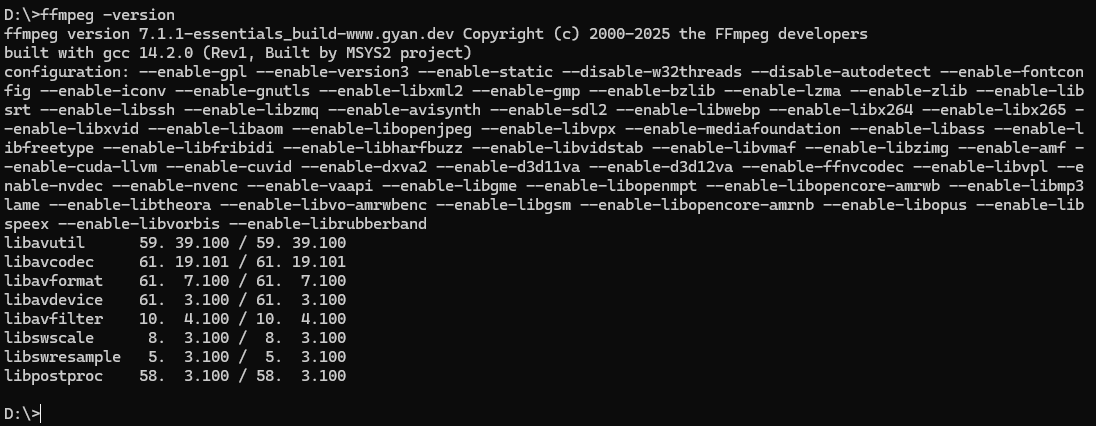
- 설치 확인:
- 새로운 명령 프롬프트(CMD) 또는 PowerShell 창을 엽니다. (환경 변수 변경 사항을 적용하려면 기존 창은 닫고 새로 열어야 합니다.)
- ffmpeg -version을 입력하여 FFmpeg 버전 정보가 올바르게 출력되는지 확인합니다.

반응형
'프로그래밍 > Python' 카테고리의 다른 글
| [python] 이미지 읽어서 스케치 형식으로 변환 (2) | 2025.08.08 |
|---|---|
| [python] 대상 주식을 시계와 함께 실행하는 .exe 파일 만들기 (4) | 2025.08.07 |
| [python] 파일 실행에 필요한 모듈 리스트 추출 방법 (1) | 2025.07.31 |
| [python] I'm Switching to Python and Actually Liking It (2) | 2025.07.22 |
| [python] networkx 설치 (0) | 2025.07.11 |


