Here’s how you can generate a one-time password (OTP) using Python:
import random

def generate_otp(length=6):
    """
    Generates a numeric OTP of the given length.
    Default length is 6.
    """
    if length <= 0:
        raise ValueError("Length must be greater than zero")
    otp = ''.join([str(random.randint(0, 9)) for _ in range(length)])
    return otp

# Example usage
otp = generate_otp(6)
print(f"Your OTP is: {otp}")
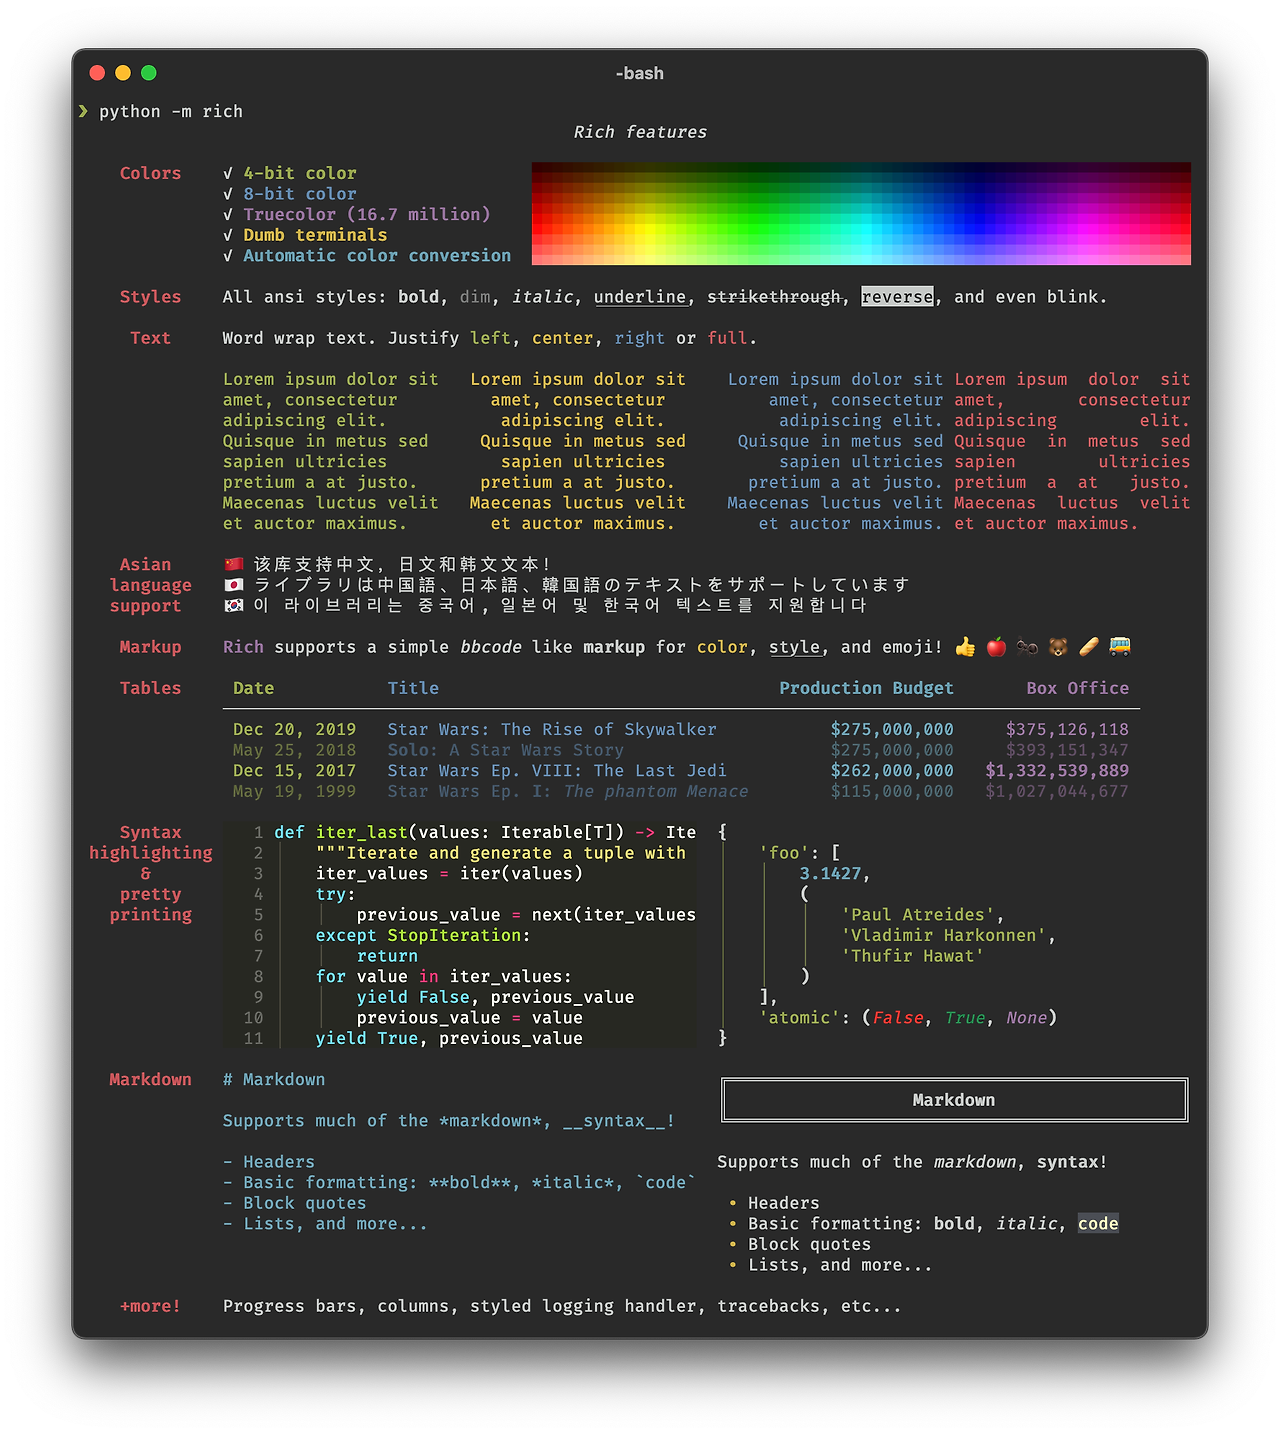
Rich is a Python library forrichtext and beautiful formatting in the terminal.
TheRich APImakes it easy to add color and style to terminal output. Rich can also render pretty tables, progress bars, markdown, syntax highlighted source code, tracebacks, and more — out of the box.
python -m pip install rich
from rich.progress import Progress
import time

def main():
    with Progress() as progress:
        task1 = progress.add_task("[cyan]Downloading...", total=100)
        task2 = progress.add_task("[magenta]Processing...", total=200)

        while not progress.finished:
            time.sleep(0.03)  # Simulate some work
            progress.update(task1, advance=1)
            progress.update(task2, advance=0.5)

if __name__ == "__main__":
    main()
from rich.progress import Progress
import time

def main():
    # Create a progress bar
    with Progress() as progress:
        # Add a task
        task = progress.add_task("[cyan]Processing...", total=100)

        # Update progress
        for i in range(100):
            time.sleep(0.05)  # Simulate some work
            progress.update(task, advance=1)  # Advance the progress bar by 1

if __name__ == "__main__":
    main()
[python] Code: Turtle Yellow Heart on Black Background
import turtle

def draw_heart():
    # Setup the screen
    screen = turtle.Screen()
    screen.bgcolor("black")  # Set background color to black
    screen.title("Yellow Heart")

    # Setup the turtle
    heart = turtle.Turtle()
    heart.shape("turtle")
    heart.speed(10)  # Set drawing speed
    heart.color("yellow")  # Set the pen color to yellow
    heart.fillcolor("yellow")  # Set the fill color to yellow

    # Start drawing the heart
    heart.begin_fill()
    heart.left(50)  # Tilt left to start the heart shape
    heart.forward(133)  # Draw the left curve

    # Left curve
    heart.circle(50, 200)  # Radius 50, 200 degrees

    # Right curve
    heart.right(140)  # Turn right to align for the other half
    heart.circle(50, 200)  # Radius 50, 200 degrees
    heart.forward(133)  # Complete the right curve
    heart.end_fill()  # Fill the shape with the selected color

    # Finish up
    heart.hideturtle()  # Hide the turtle pointer
    screen.mainloop()  # Keep the window open

# Call the function
if __name__ == "__main__":
    draw_heart()
# Spiral Web using Matplotlib and NumPy

import numpy as np
import matplotlib.pyplot as plt

def draw_spiral_web():
    # Parameters
    num_lines = 50  # Number of radial lines
    num_circles = 10  # Number of concentric circles
    max_radius = 10  # Maximum radius of the spiral web

    # Generate theta for radial lines (angle from 0 to 2*pi)
    theta = np.linspace(0, 2 * np.pi, num_lines, endpoint=False)

    # Generate radii for concentric circles
    radii = np.linspace(0, max_radius, num_circles)

    # Create a figure
    fig, ax = plt.subplots(figsize=(6, 6), subplot_kw={'projection': 'polar'})
    ax.set_facecolor('black')  # Set background color to black
    ax.set_xticks([])  # Remove angular ticks
    ax.set_yticks([])  # Remove radial ticks

    # Draw radial lines
    for t in theta:
        ax.plot([t, t], [0, max_radius], color='cyan', linewidth=0.7)

    # Draw concentric circles
    for r in radii:
        ax.plot(np.linspace(0, 2 * np.pi, 100), [r] * 100, color='cyan', linewidth=0.7)

    # Add a spiral
    spiral_theta = np.linspace(0, 4 * np.pi, 500)  # 2 full rotations
    spiral_r = np.linspace(0, max_radius, 500)
    ax.plot(spiral_theta, spiral_r, color='yellow', linewidth=1)

    # Set aspect ratio and display the plot
    ax.set_ylim(0, max_radius)
    plt.show()

# Call the function to draw the spiral web
if __name__ == "__main__":
    draw_spiral_web()
사용자가 초 단위로 시간을 입력하면 카운트다운을 실행하는 간단한 Python 프로그램입니다.
time 모듈을 사용하여 매초 업데이트하며, 남은 시간을 출력합니다.
# 사용자가 초 단위로 시간을 입력하면 카운트다운을 실행하는 간단한 Python 프로그램입니다.
# time 모듈을 사용하여 매초 업데이트하며, 남은 시간을 출력합니다.
import time

def countdown(seconds):
    """
    Counts down from the given number of seconds.

    :param seconds: Total seconds to count down
    """
    try:
        while seconds >= 0:
            mins, secs = divmod(seconds, 60)
            timer = f"{mins:02}:{secs:02}"  # Format as MM:SS

            # 매초마다 동일한 줄에 시간을 출력.
            # end="\r"를 사용하여 이전 출력 내용을 덮어씁니다.
            print(timer, end="\r")  # Print on the same line

            time.sleep(1)  # Wait for 1 second
            seconds -= 1
        print("Time's up!")
    except KeyboardInterrupt:
        print("\nCountdown stopped.")

# Example: Enter seconds to countdown
if __name__ == "__main__":
    try:
        user_input = int(input("Enter the number of seconds for countdown: "))
        countdown(user_input)
    except ValueError:
        print("Please enter a valid integer.")
Python을 사용하여 Wi-Fi QR 코드를 생성하려면 qrcode 및 Pillow 라이브러리를 활용할 수 있습니다. Wi-Fi QR 코드의 데이터 형식은 다음과 같습니다:
import qrcode
from PIL import Image

def generate_wifi_qrcode(ssid, password, encryption="WPA", hidden=False, output_file="wifi_qrcode.png"):
    """
    Generates a Wi-Fi QR code and saves it as an image.

    :param ssid: The Wi-Fi network name (SSID)
    :param password: The Wi-Fi password
    :param encryption: Encryption type ('WPA', 'WEP', or 'nopass')
    :param hidden: Whether the network is hidden (True/False)
    :param output_file: Name of the output image file
    """
    # Format Wi-Fi QR code data
    wifi_data = f"WIFI:S:{ssid};T:{encryption};P:{password};H:{'true' if hidden else 'false'};;"

    # Generate QR code
    qr = qrcode.QRCode(
        version=1,
        error_correction=qrcode.constants.ERROR_CORRECT_L,
        box_size=10,
        border=4,
    )
    qr.add_data(wifi_data)
    qr.make(fit=True)

    # Create and save the QR code image
    img = qr.make_image(fill_color="black", back_color="white")
    img.save(output_file)
    print(f"Wi-Fi QR code saved as {output_file}")

    # Open and show the image
    img.show()

# Example usage
generate_wifi_qrcode(
    ssid="MyWiFiNetwork",
    password="MySecurePassword",
    encryption="WPA",  # WPA/WEP/nopass
    hidden=False,       # Hidden network? True/False
    output_file="wifi_qrcode.png"
)


 Dependencies